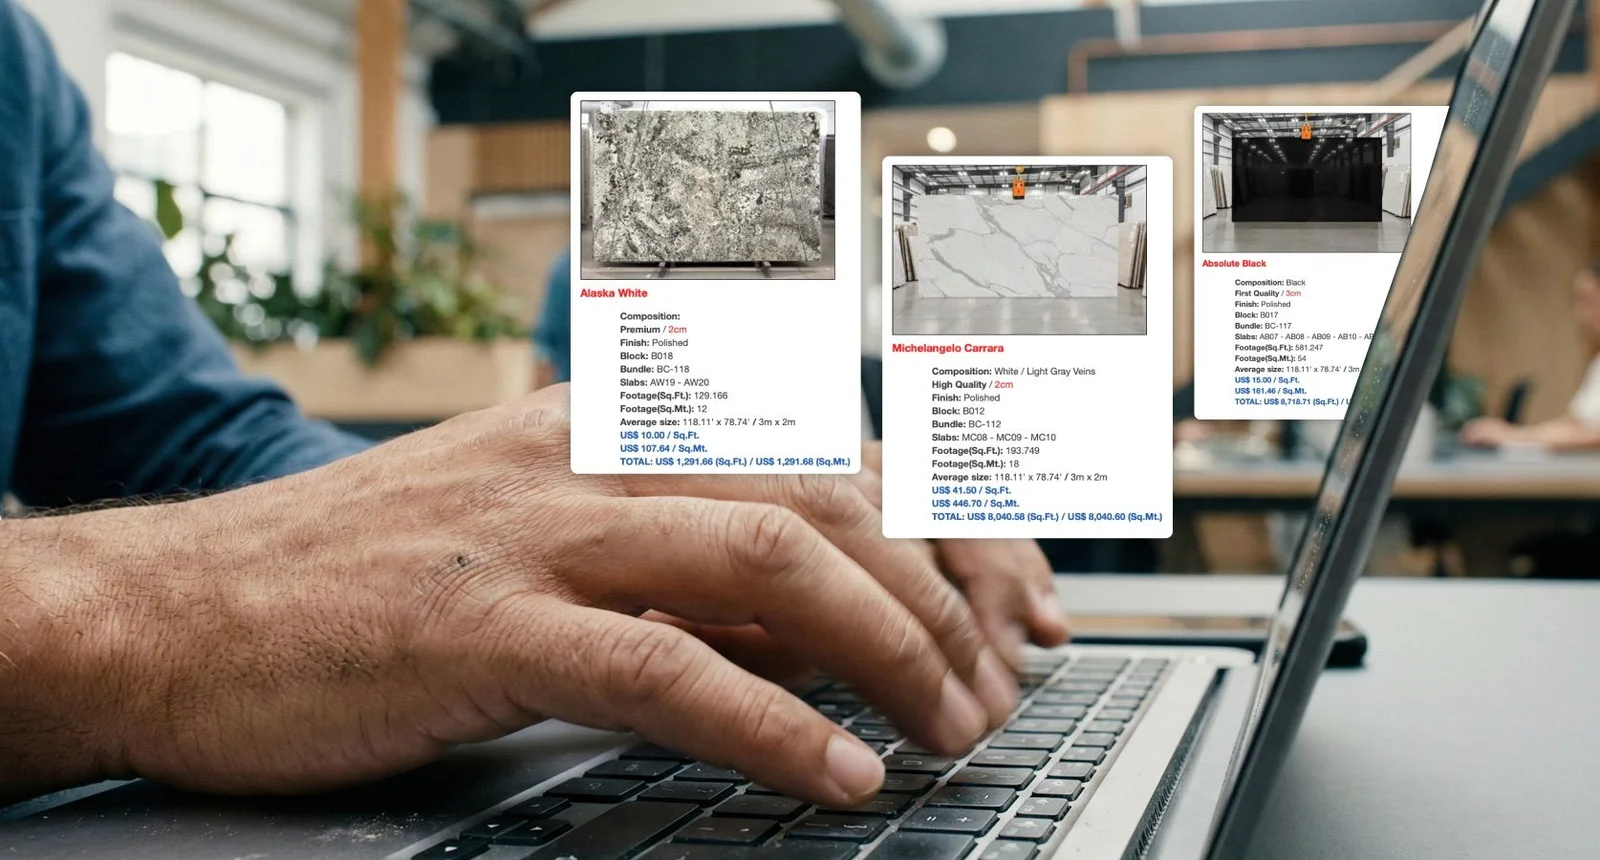

Email marketing is one of the most effective ways for stone distributors to promote new arrivals, announce inventory sales, and showcase high-value bundles directly to fabricators and commercial clients.
With SlabWare Distributor, the built-in Mailing feature works like a targeted newsletter system—allowing you to pick specific inventory bundles, select target contacts, customize layouts, and track open and click rates in real time.
If you want, you can watch this tutorial in our YouTube channel by clicking here.
In this tutorial, we will walk you through setting up, sending, and tracking email mailings in SlabWare Distributor.
📋 Prerequisites Before You Begin
To ensure your mailing campaign runs smoothly:
Customer Contacts: Ensure your customers are registered in SlabWare with valid email addresses.
Updated Inventory: Confirm that your stone bundles have updated photos, specifications, and dimensions in the system.
Mailing Permissions: Make sure your user profile has mailing permissions enabled. (If access is blocked, follow the prompt links to complete your Email and User Settings setup).
📊 Phase 1: Navigating the Mailing Directory & Analytics Dashboard
To view past campaigns or access analytics:
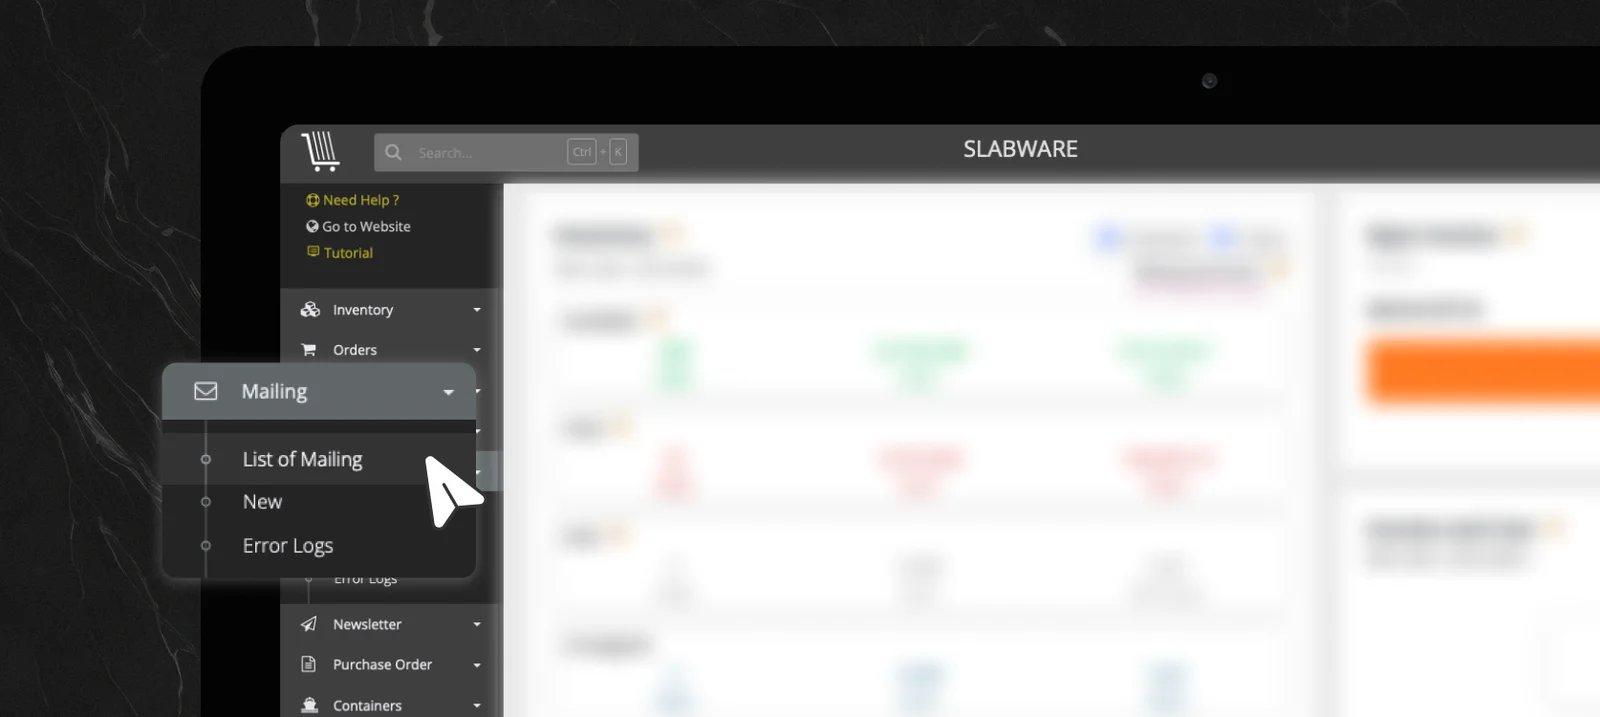
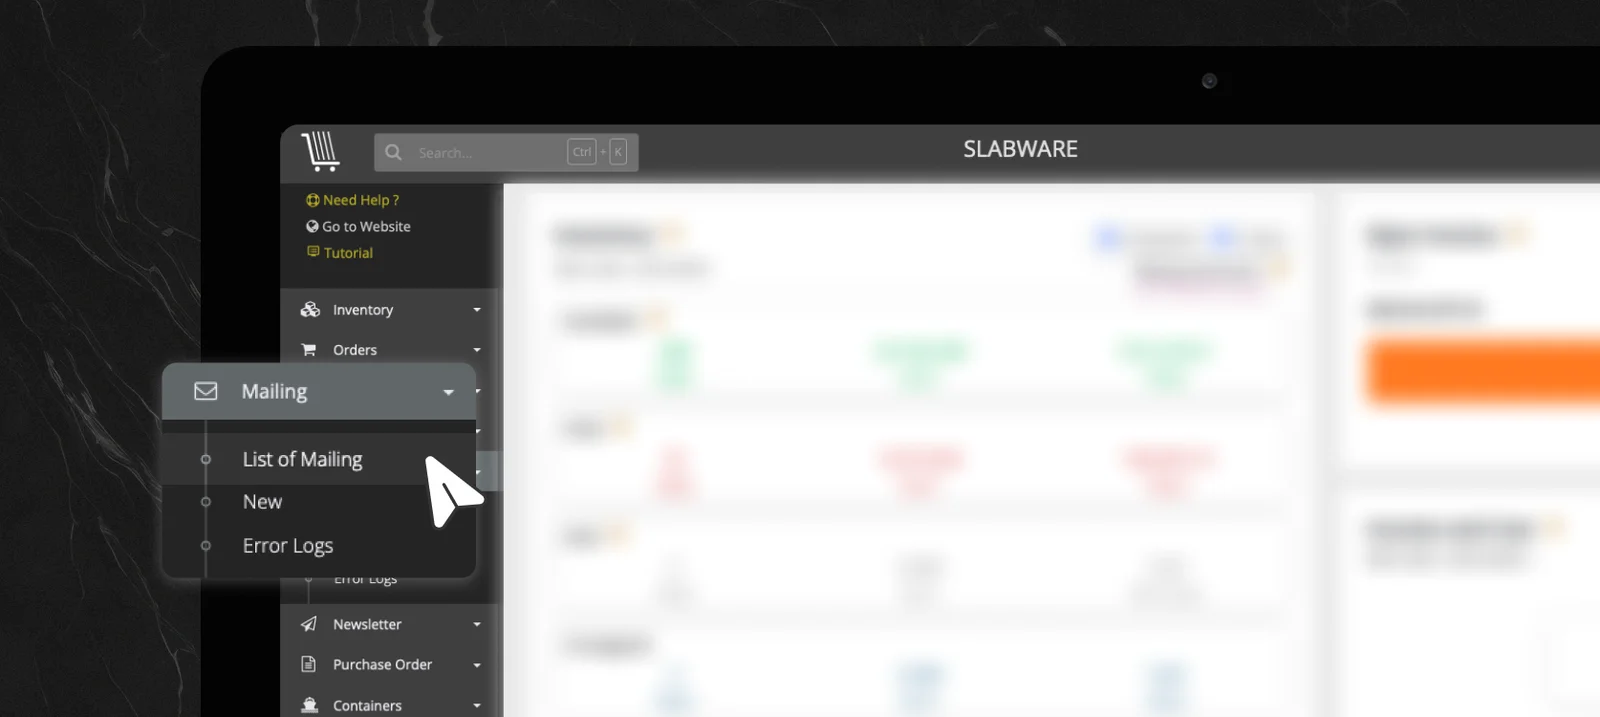
Go to Mailing ➔ List of Mailing from the main menu.
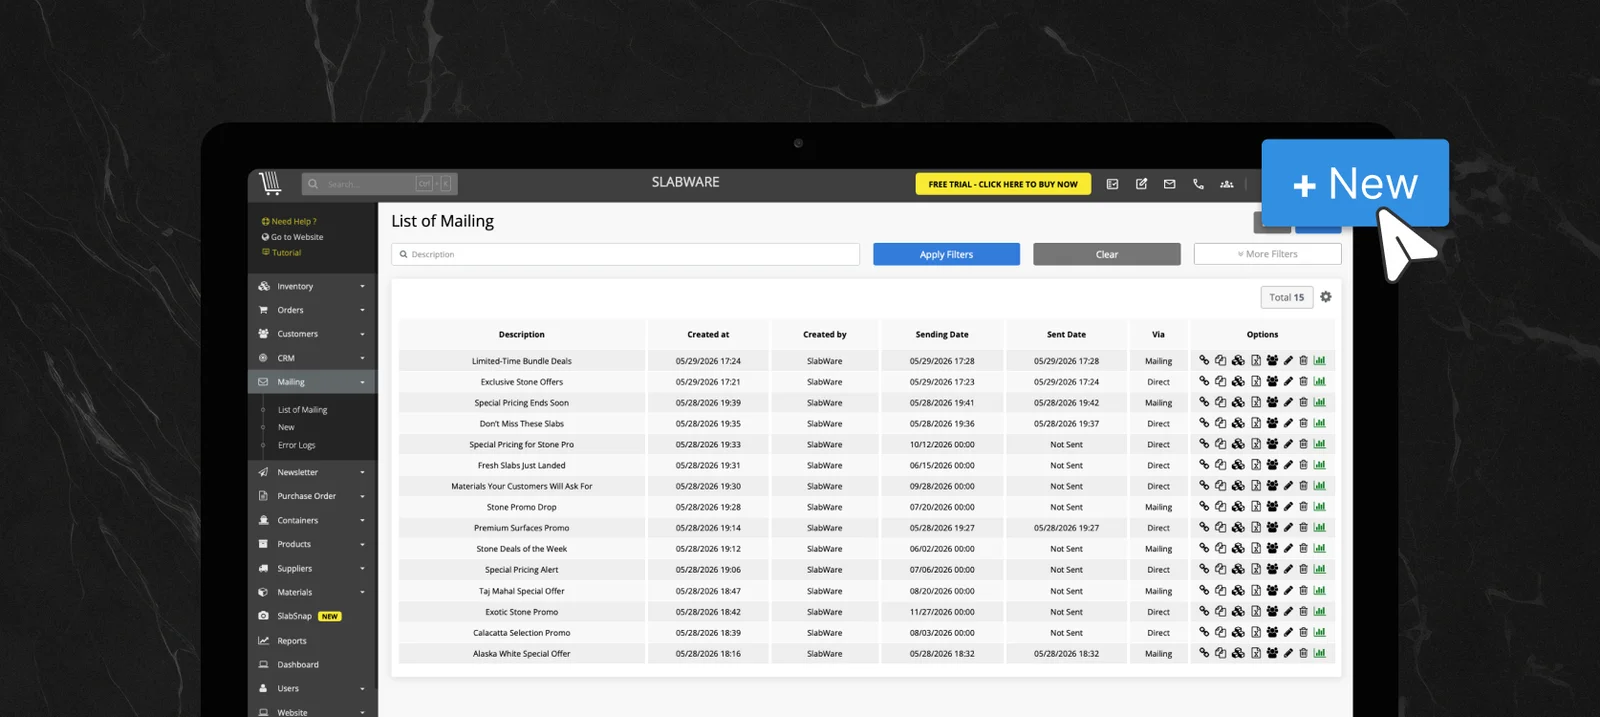
Here, you will see a comprehensive log of all sent and scheduled campaigns, including creation date, creator, scheduled delivery time, and mailing type.
Available Directory Actions:
🔗 Copy Link: Share a web URL of the selected bundle catalog directly with anyone.
📋 Clone: Duplicate an existing campaign layout to save time on future mailings.
📦 View Bundles: Re-examine the specific bundles included in a past campaign.
📥 Export Excel Report: Download a detailed spreadsheet containing recipient activity and contact lists.
✏️ Edit/Delete: Modify pending mailings or remove old campaigns from your dashboard.
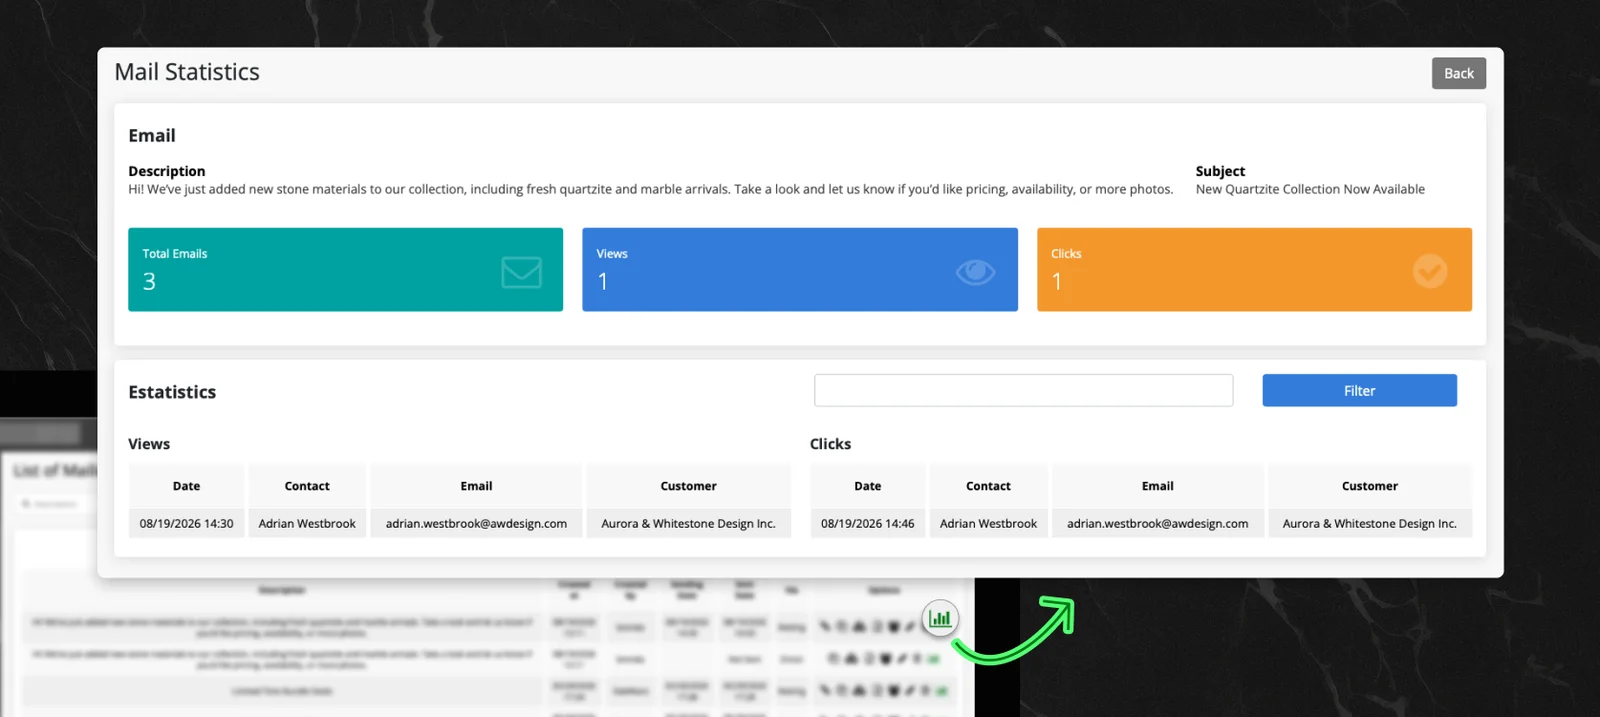
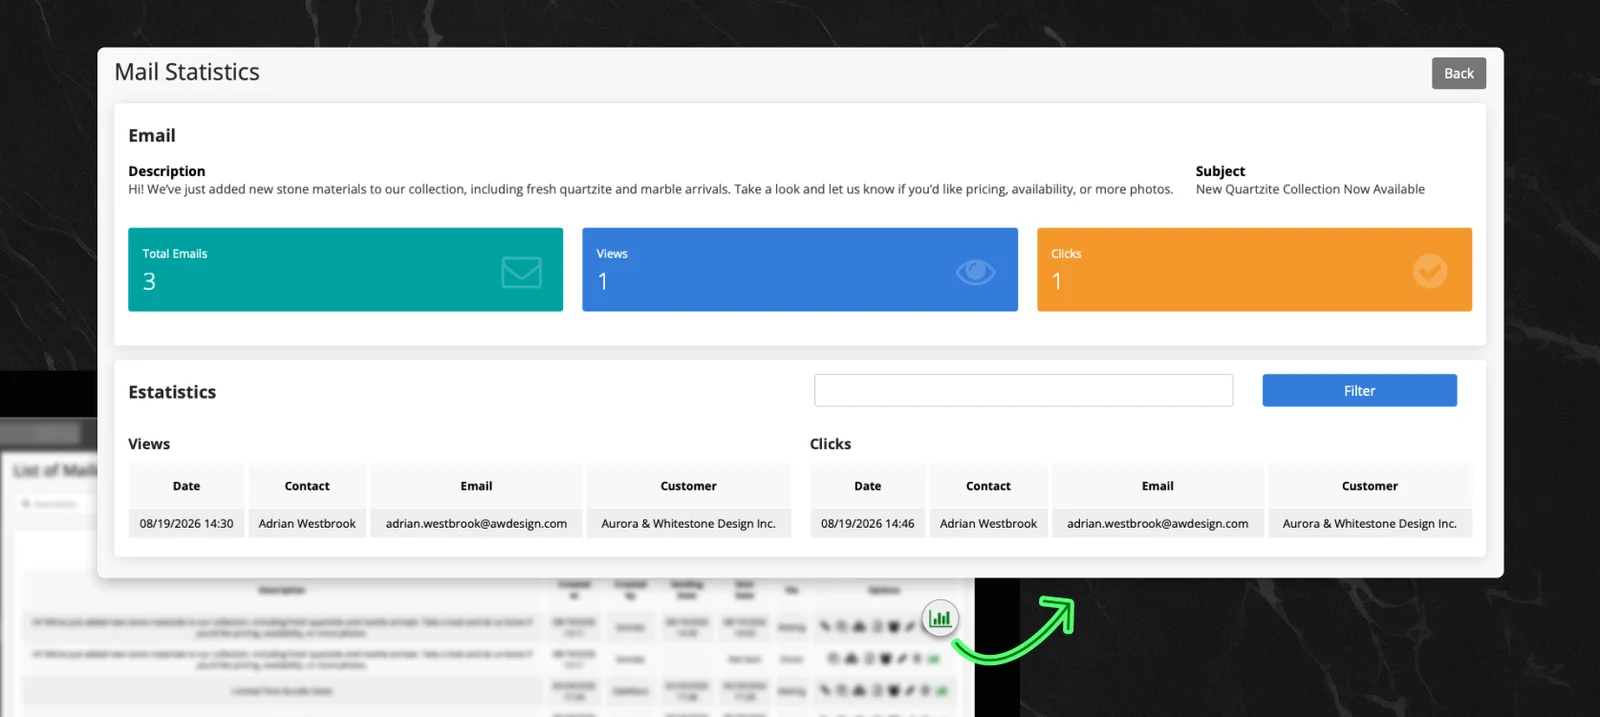
📈 Performance Tracking (Chart Icon): Click the chart icon to track campaign metrics:
Total Emails Sent
Email Open Rate (Views)
Click-Through Rate (Clicks)
🛠️ Phase 2: Creating a New Mailing Campaign
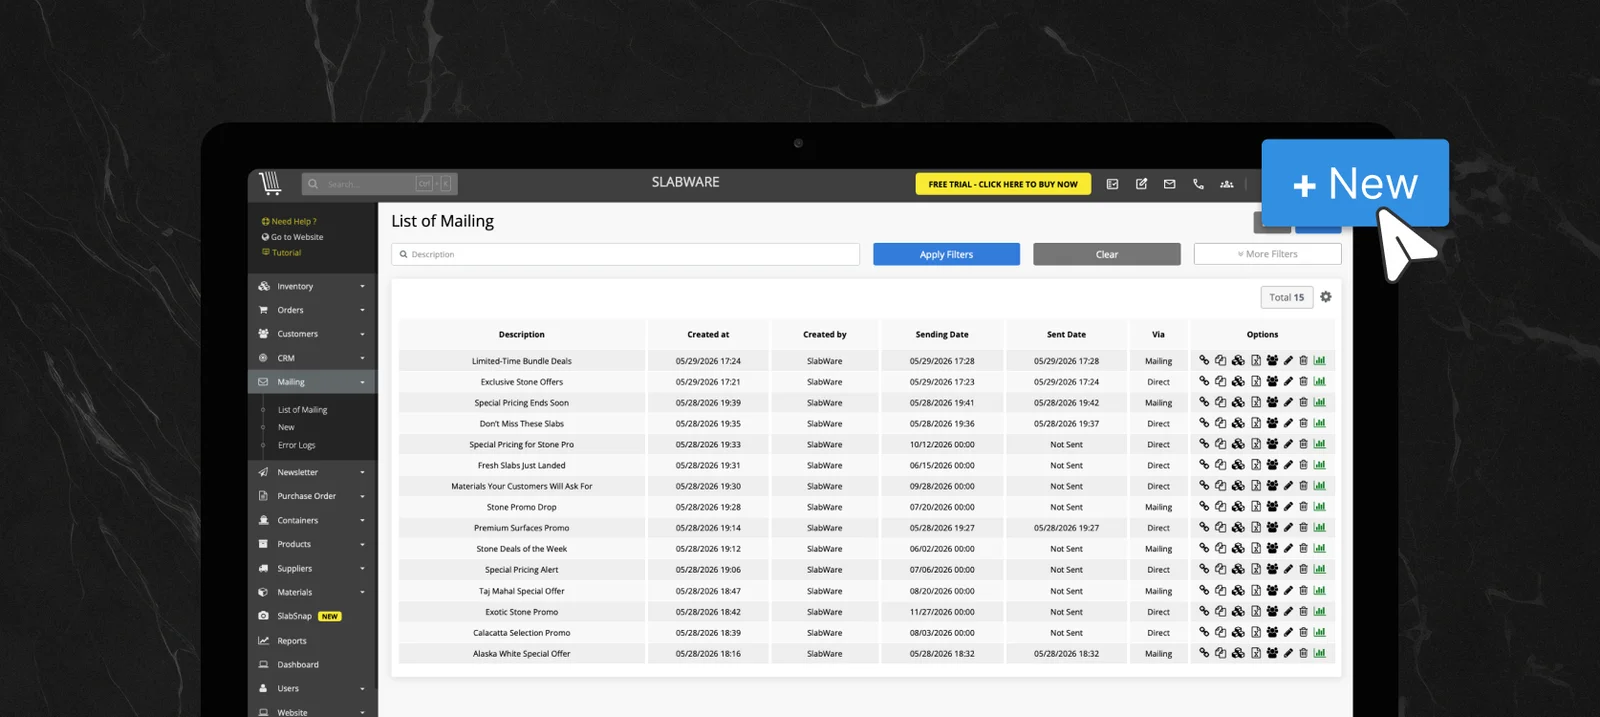
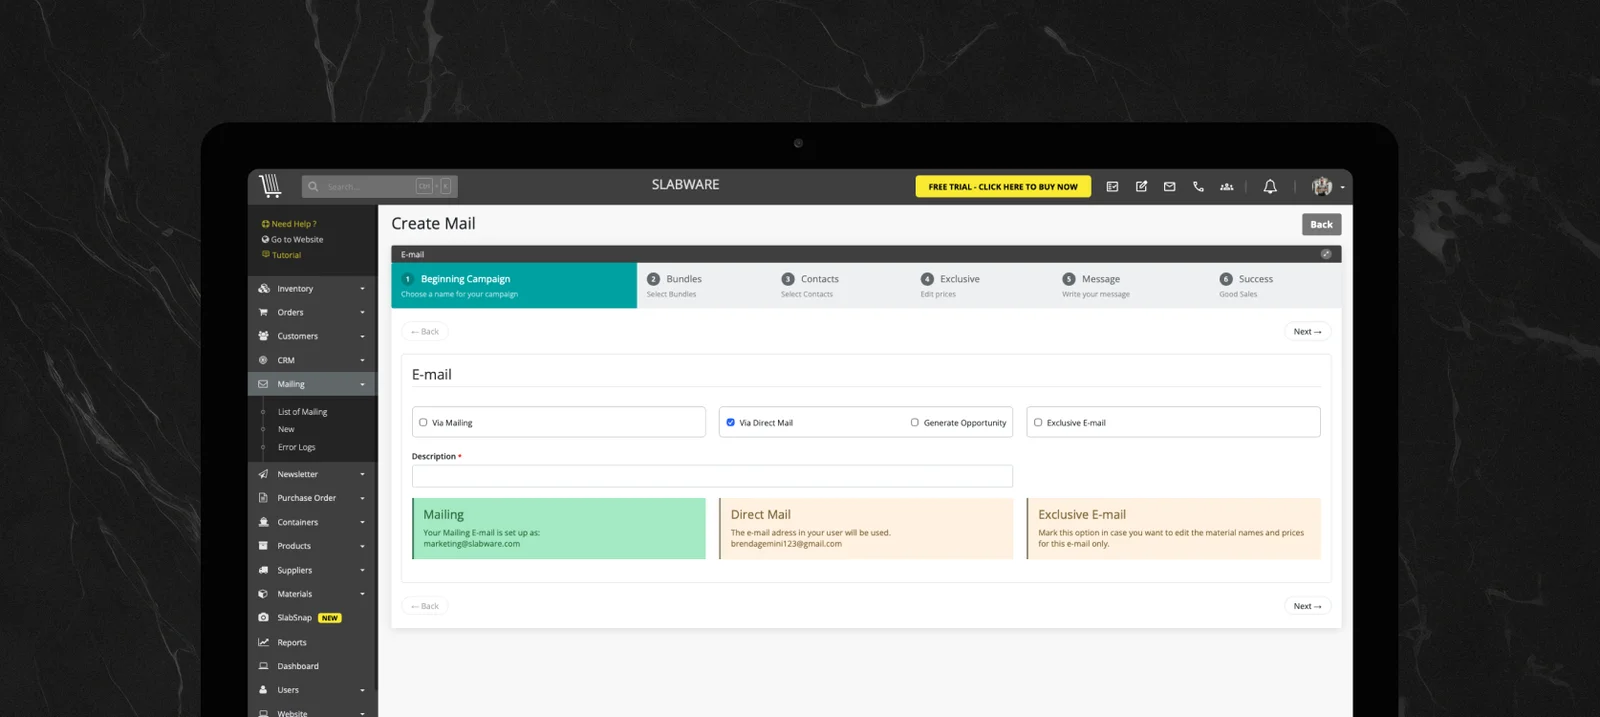
From the main menu, click Mailing or click the + New button at the top of the List of Mailing page.
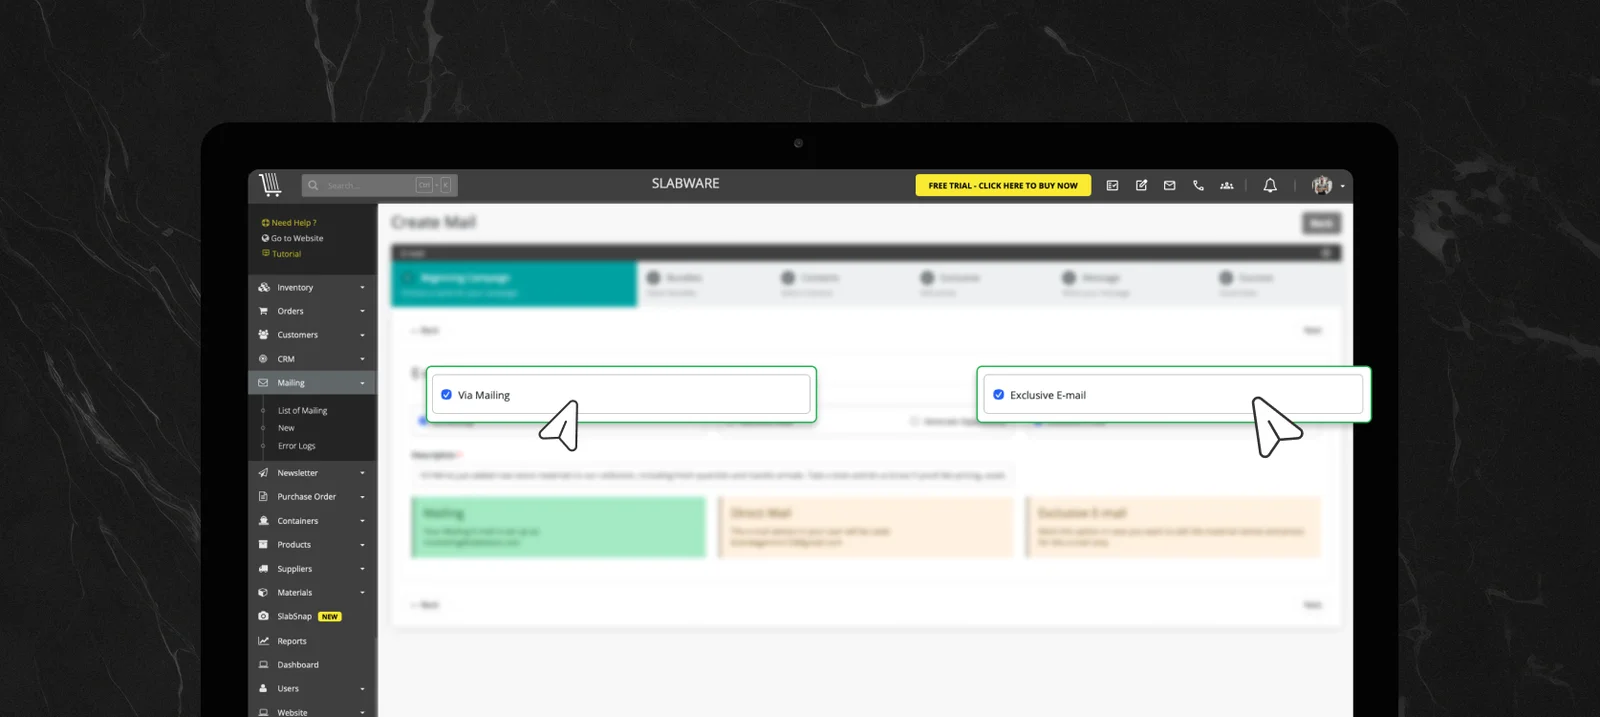
Select your delivery channel and campaign style:
Mailing Type Options
Via Mailing --> For broadcasting to large customer lists (50+ contacts)
Direct Mail --> Recommended for small groups (Up to 50 contacts) │ *Optional: Check "Generate Opportunity" to create a CRM task
Exclusive Email --> Allows override of standard price/sq.ft or sq.m per bundle (Sent via Mailing or Direct Mail)
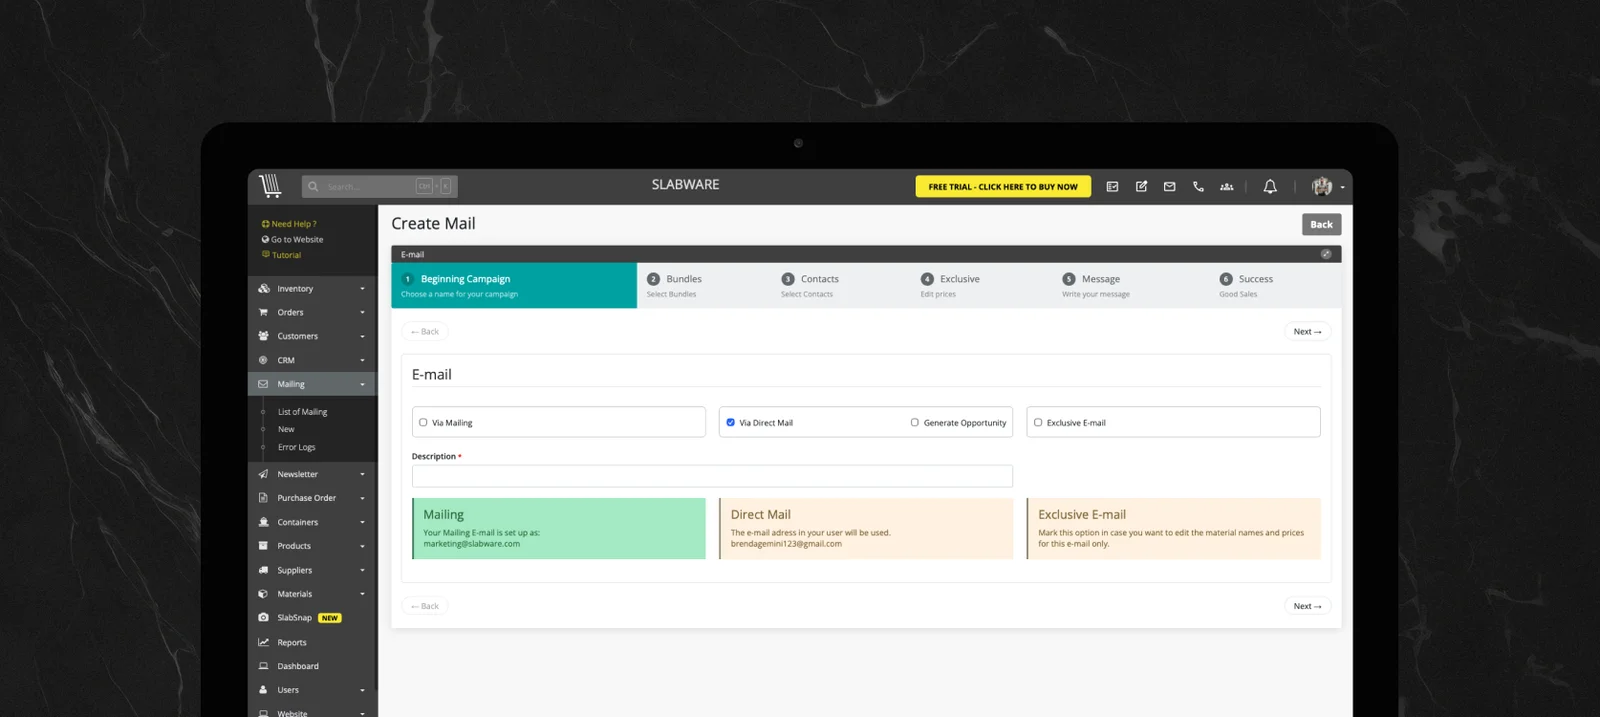
Type a clear internal Description (e.g., "June Taj Mahal Promotion") and click Next.
Make sure your user profile has mailing permissions enabled. If that is not the case, some functions will be disabled in this screen.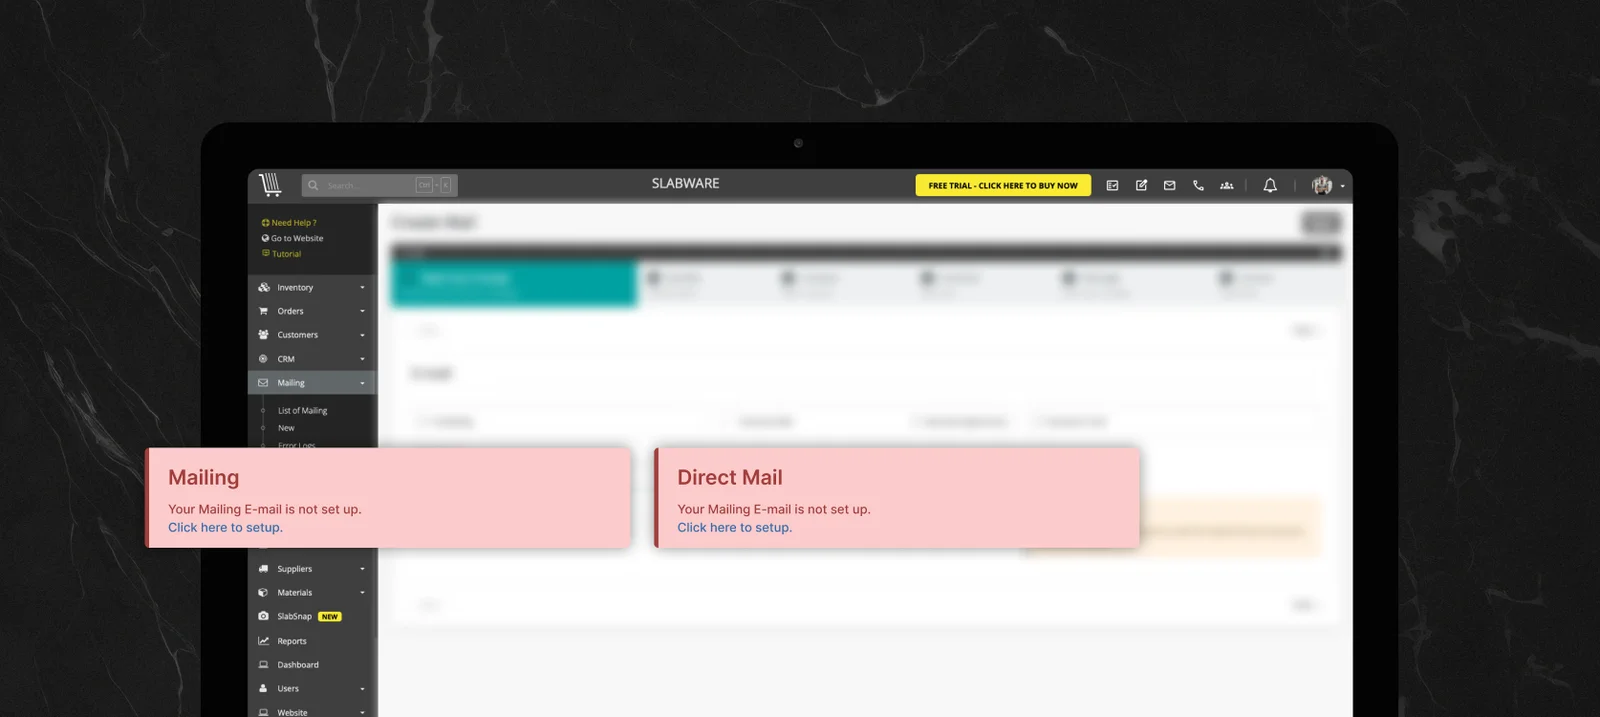
If that happens, check out this YouTube video to learn how to configure your permissions.
📦 Phase 3: Selecting Inventory Bundles
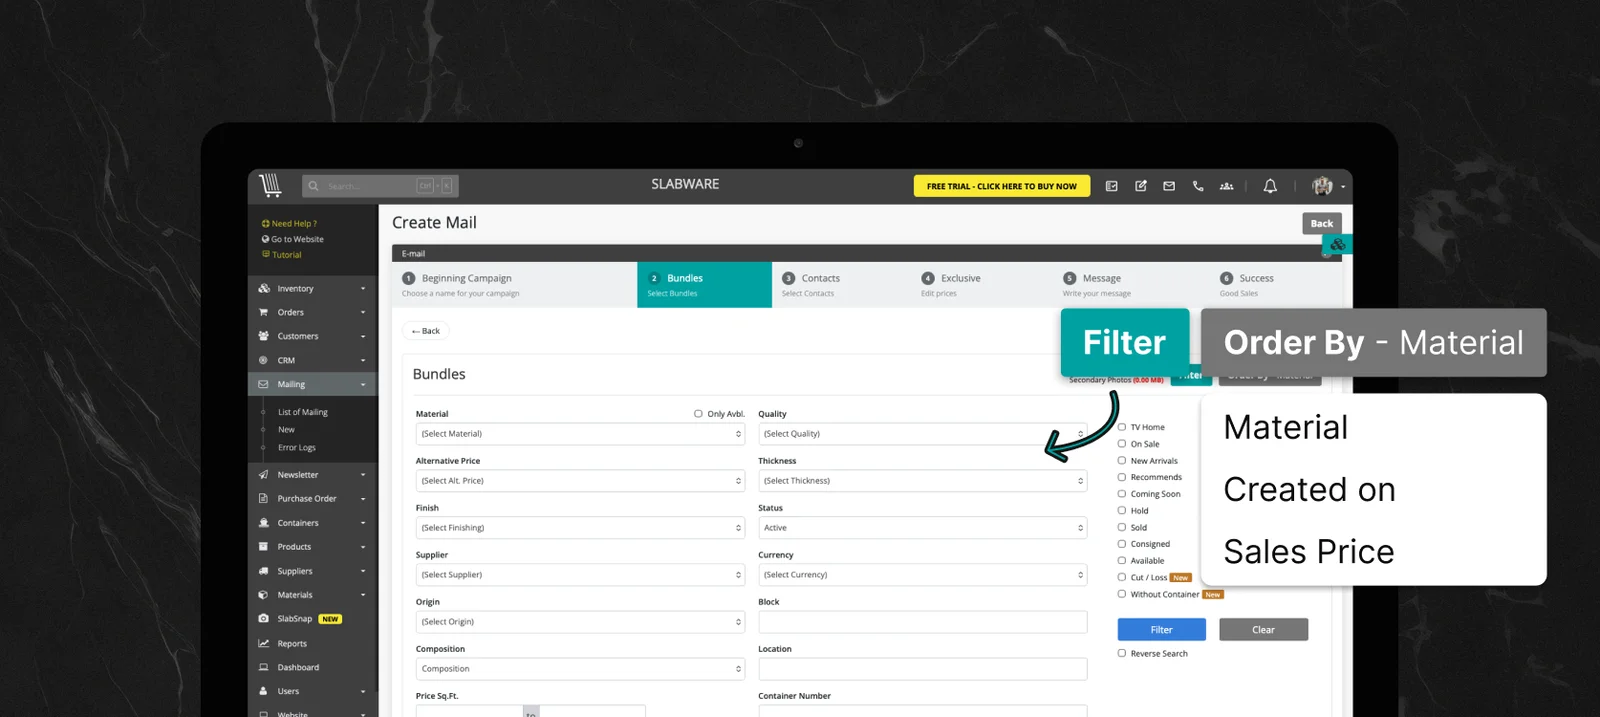
On the Select Bundles page, sort your available inventory under Order By:
Material: Alphabetical order by stone type.
Created On: Recently added stock.
Sales Price: Highest to lowest pricing.
Use the search bar or filters to locate specific materials or lot numbers.
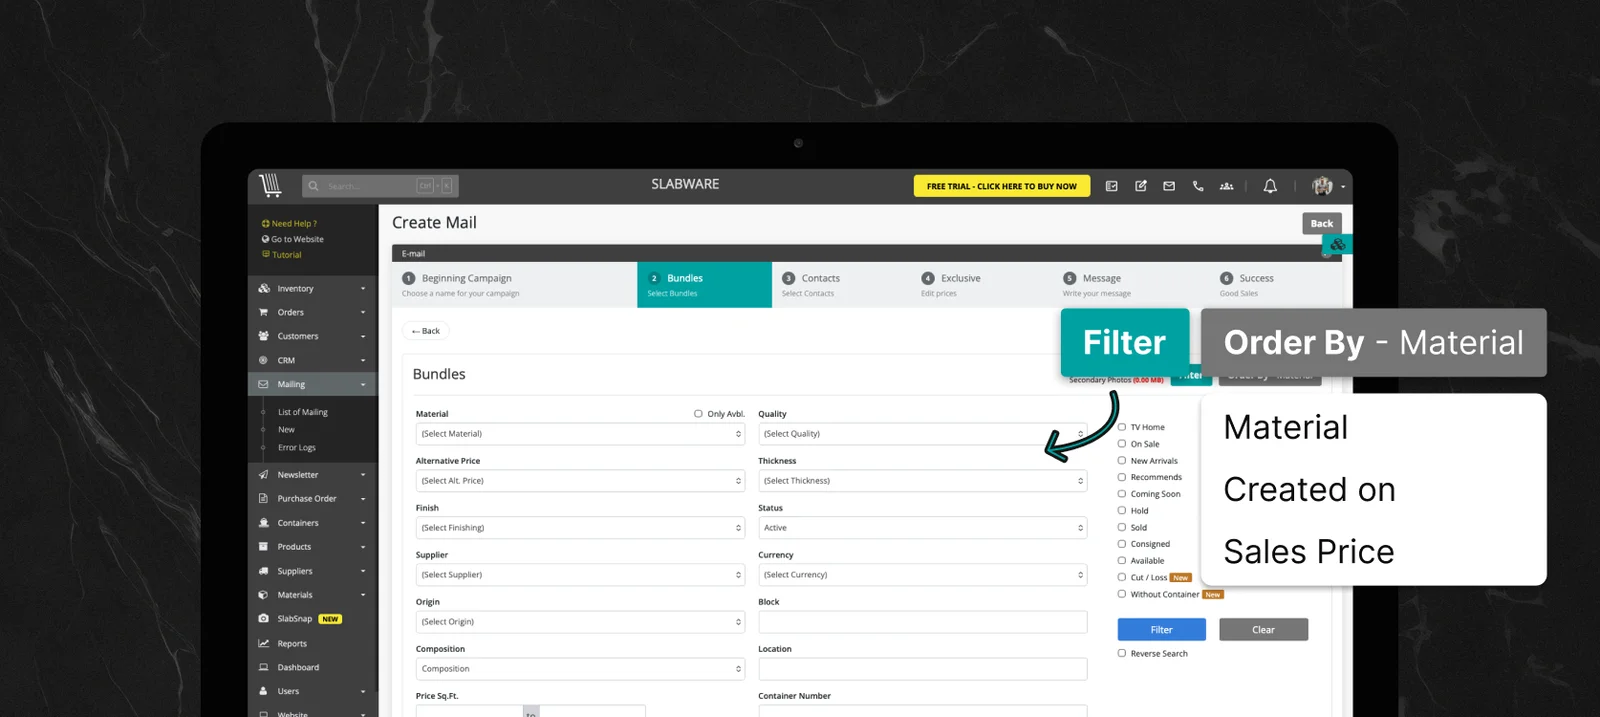
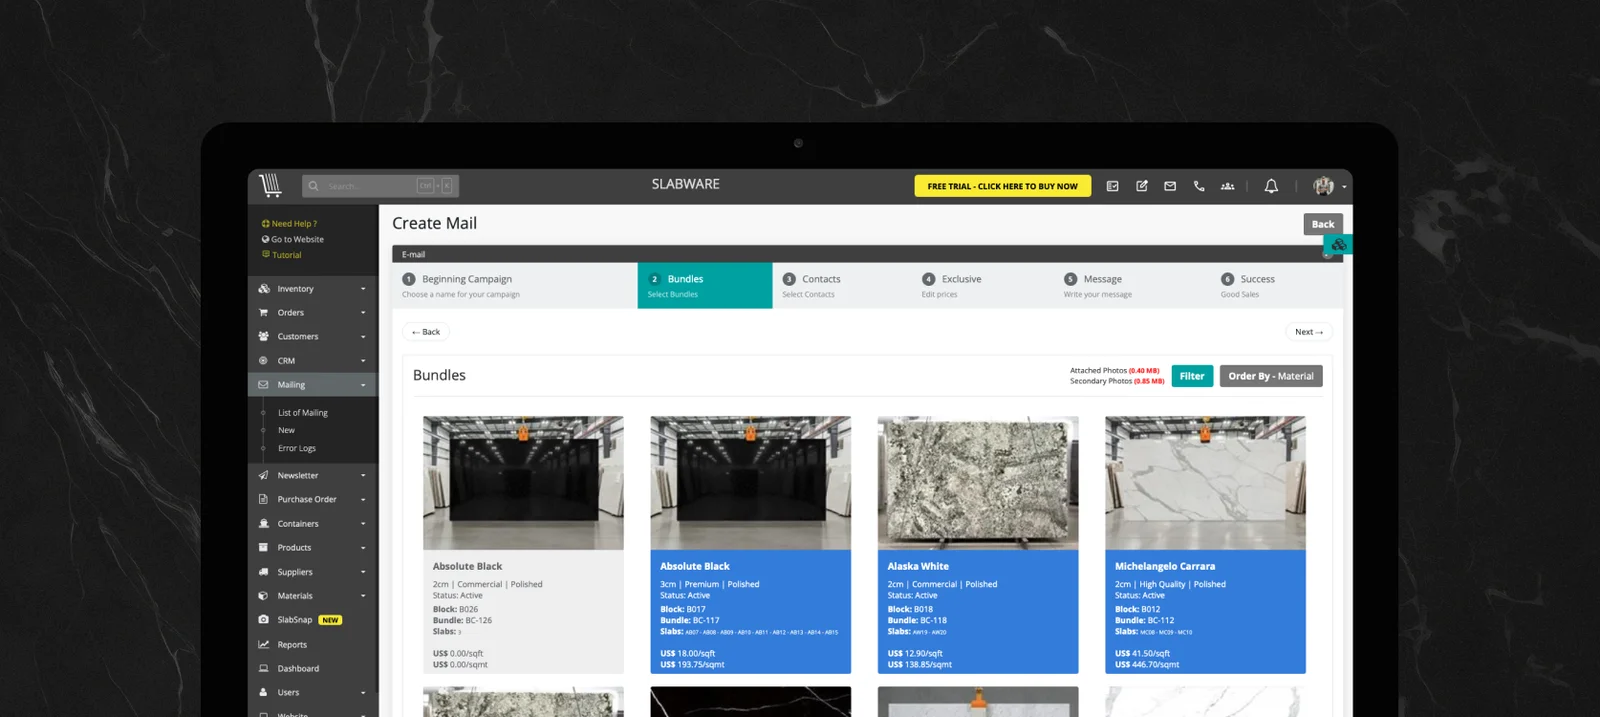
Check the boxes next to the bundles you want to feature, then click Next.
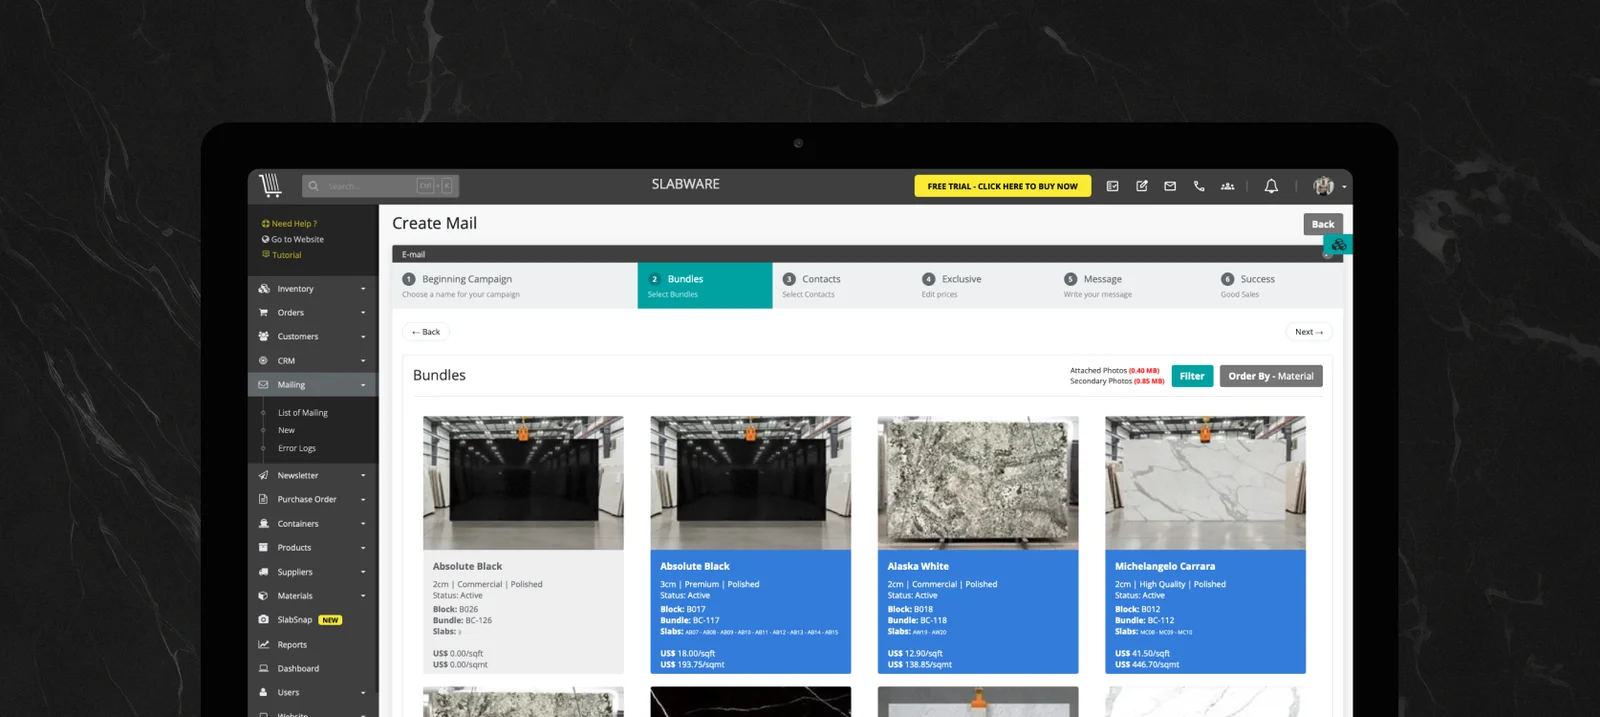
👥 Phase 4: Choosing Target Recipients
Search and select the customer contacts who should receive the campaign.
Check individual boxes or choose Select All.
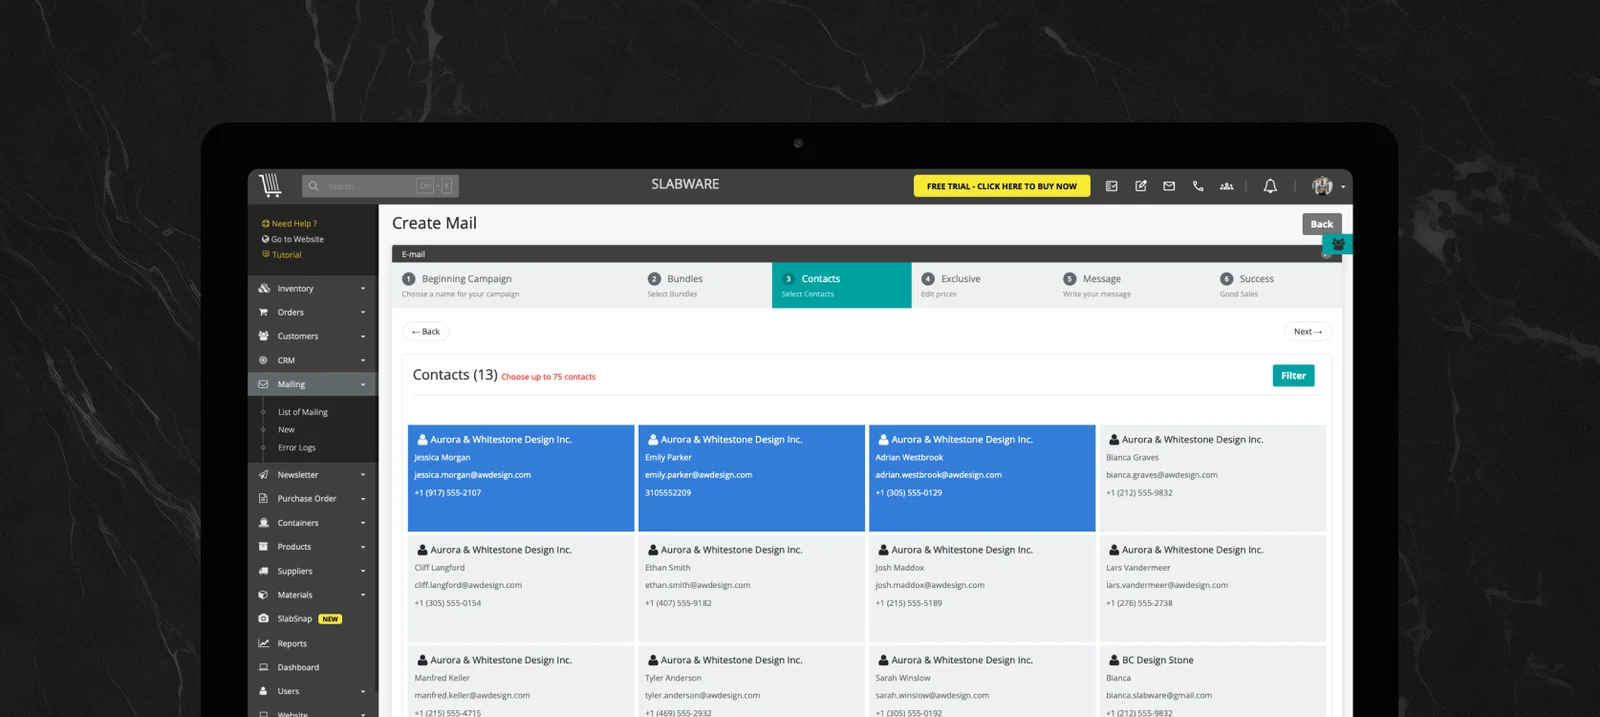
Click Next to proceed to email configuration.
✉️ Phase 5: Configuring the Email Layout & Settings
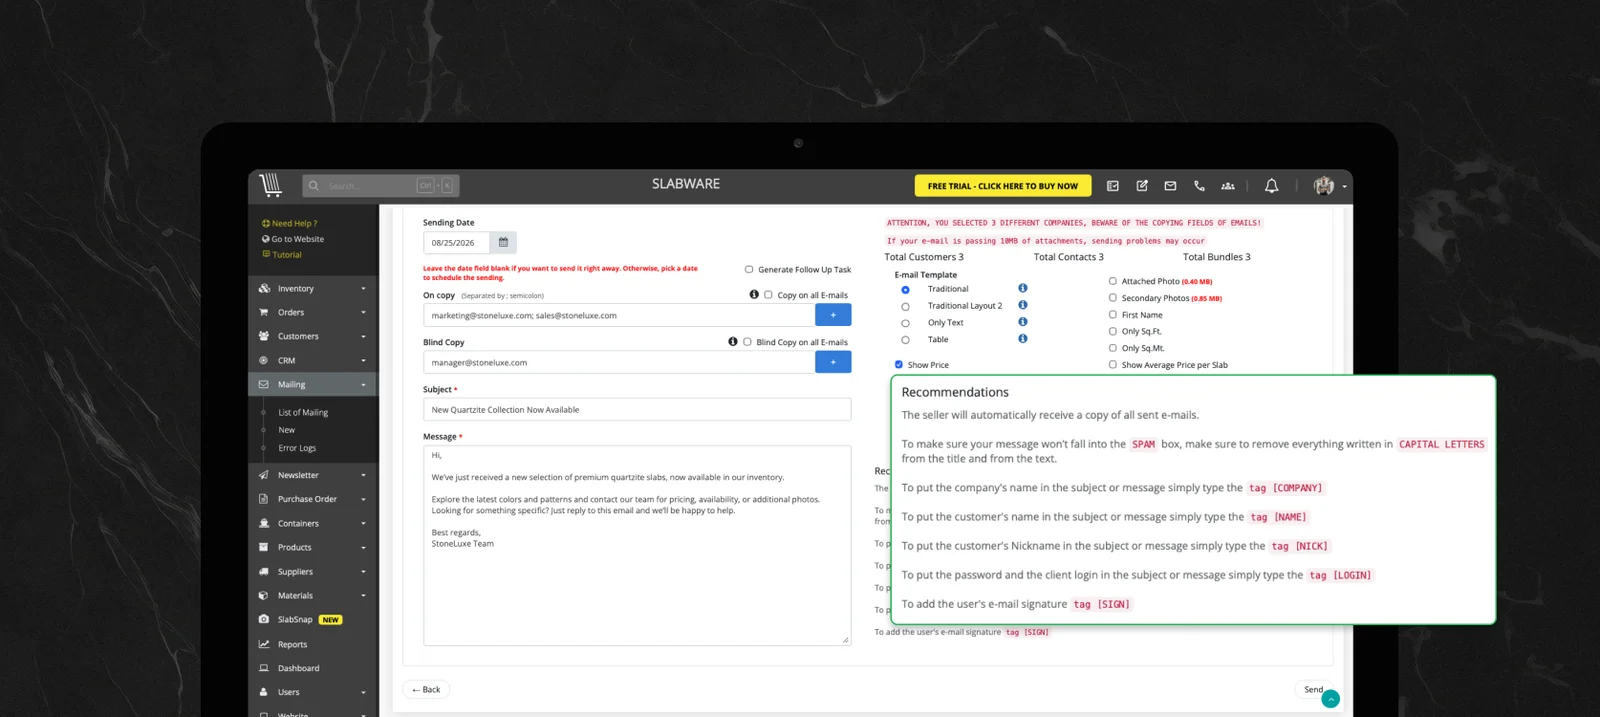
On the email configuration screen, customize your delivery schedules, tracking rules, and visuals:
1. Delivery & CRM Settings
Scheduled Date: Choose a future date/time to send the email. Leave blank to send immediately.
Generate Follow-upTask: Check this box to automatically assign a follow-up task in your CRM pipeline.
Copy / Blind Copy (CC / BCC): Add team members or external emails who need to monitor the mailing.
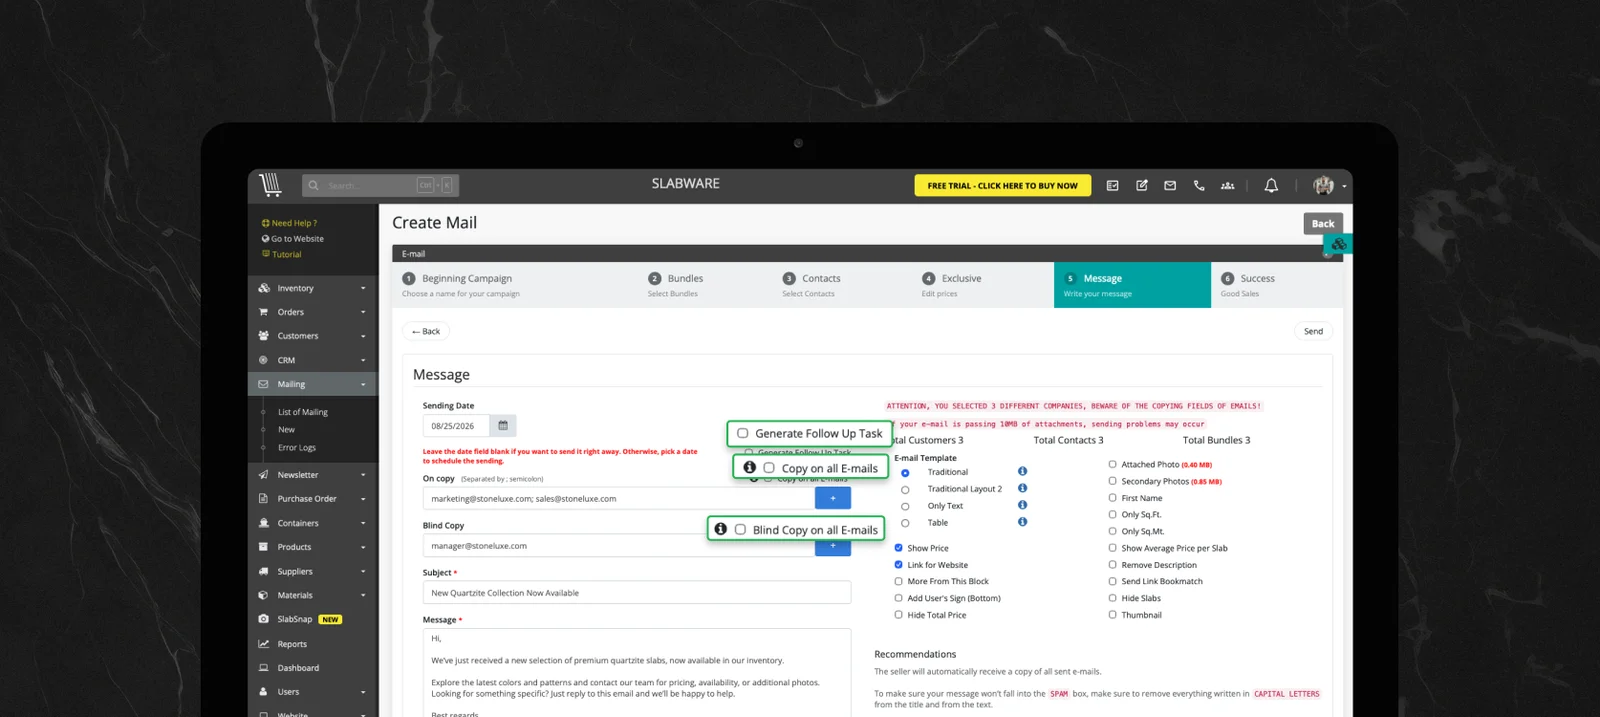
2. Subject & Message Body
Type an engaging Subject Line (e.g., "Exclusive New Arrival: Premium Calacatta Bundles In Stock").
Write your message in the body editor. You can insert dynamic tags recommended at the bottom of the page to personalize the message.
3. Choose Your Email Template
Click the blue info icon to preview the available template formats:
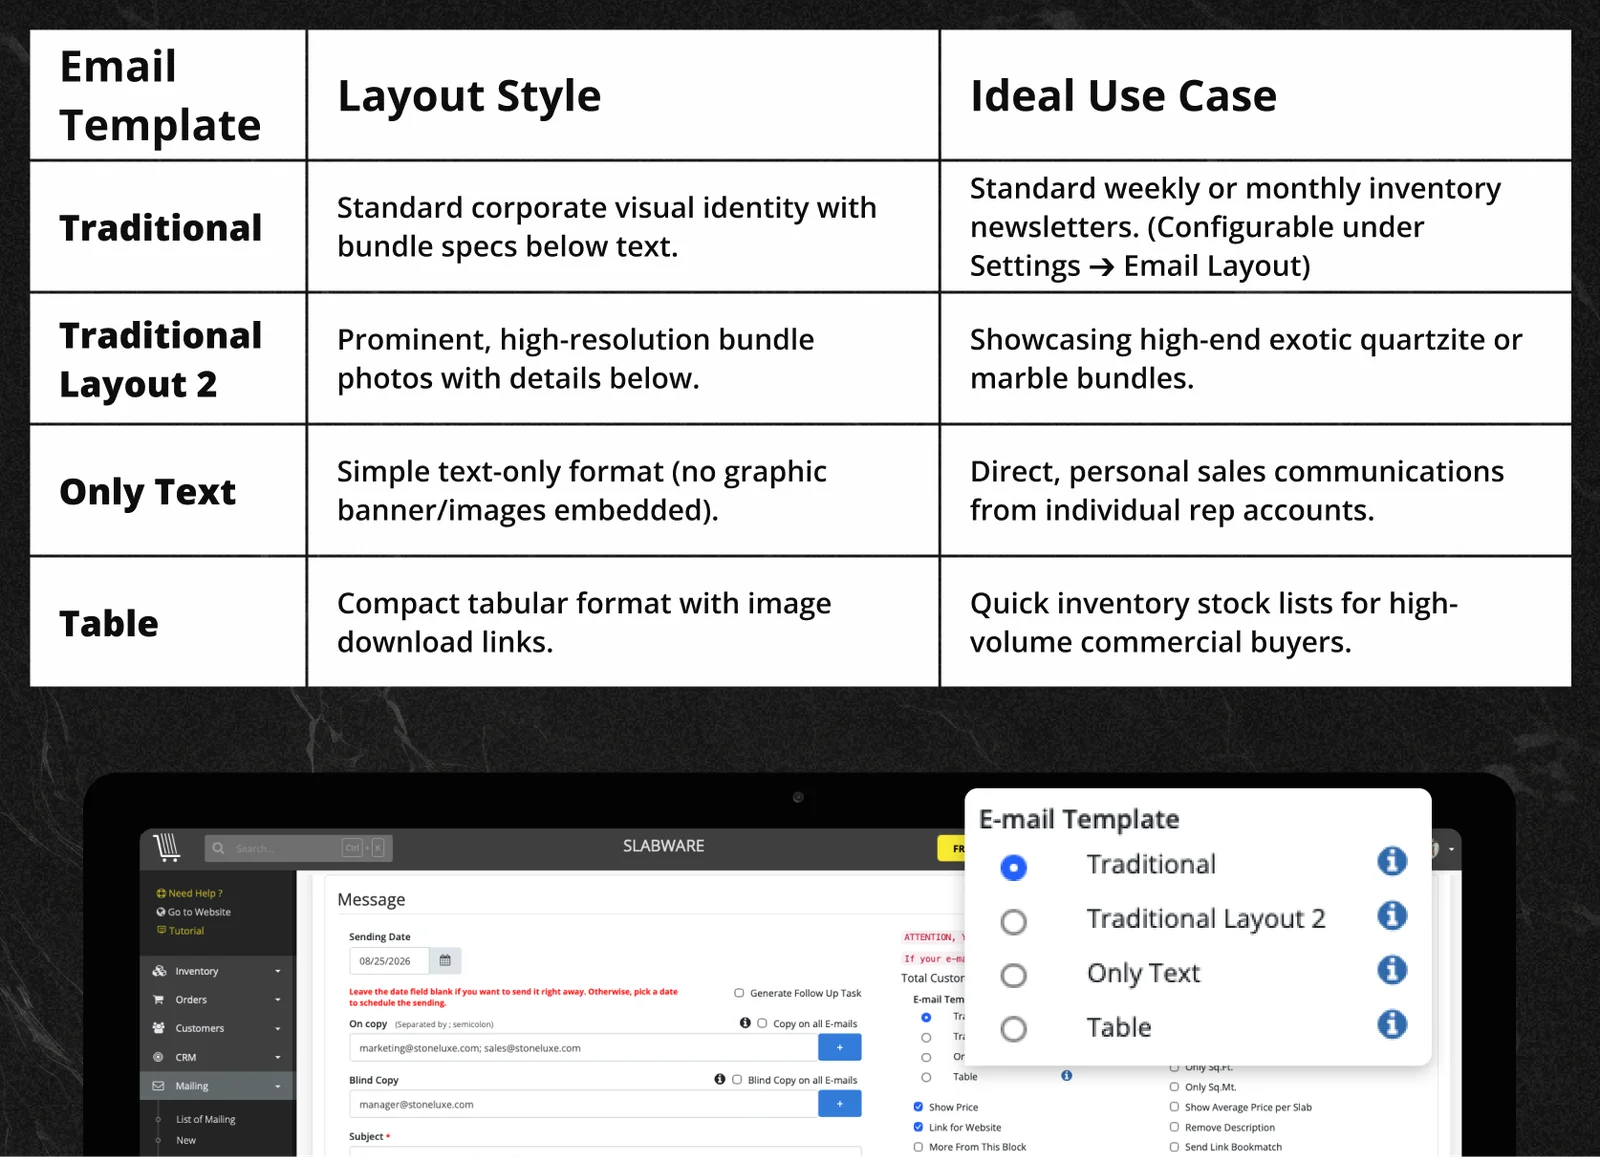
⚠️ Important Note on Text-Only Templates: The link displayed at the bottom of the Only Text format is an Unsubscribe Link, not a bundle catalog link. If using this format, ensure you paste the catalog link directly into the email text!
💲 Special Feature: Using "Exclusive Email" Pricing
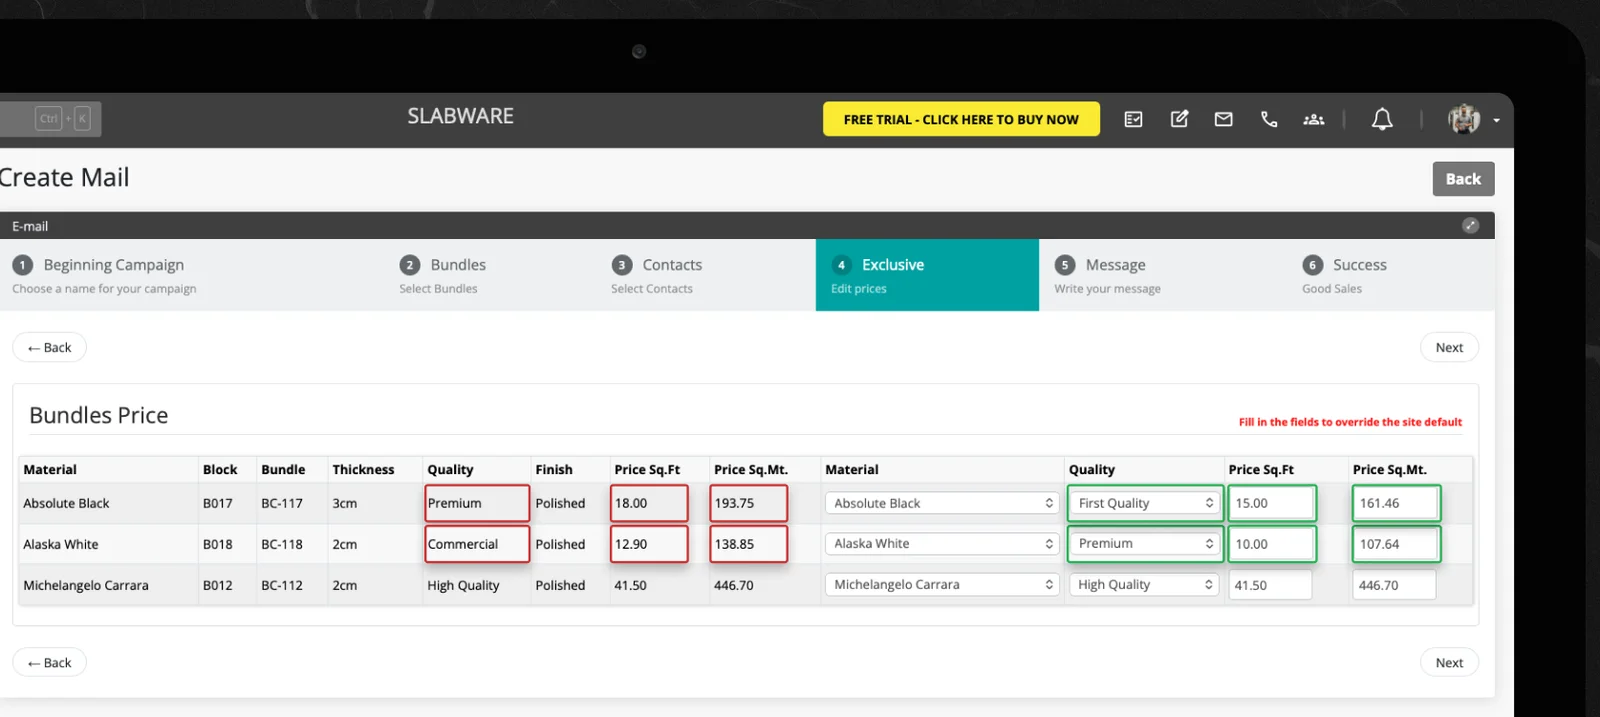
If you choose Exclusive Email during Phase 2, you can adjust price quotes for specific recipients without altering your baseline inventory settings:
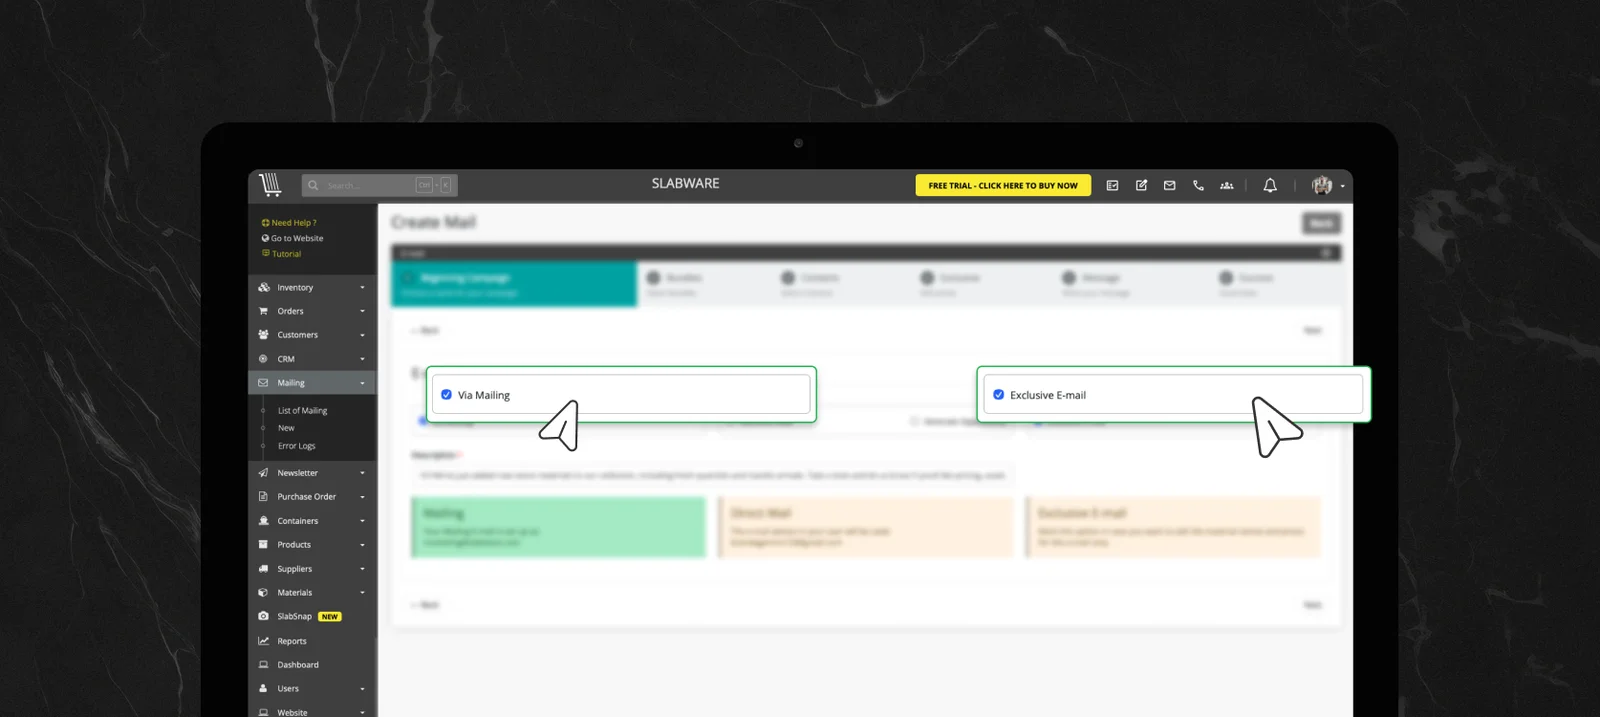
Proceed through bundle and contact selection.
On the configuration screen, override specific fields per bundle:
Material Type & Quality Grade
Exclusive Price per Square Foot / Square Meter
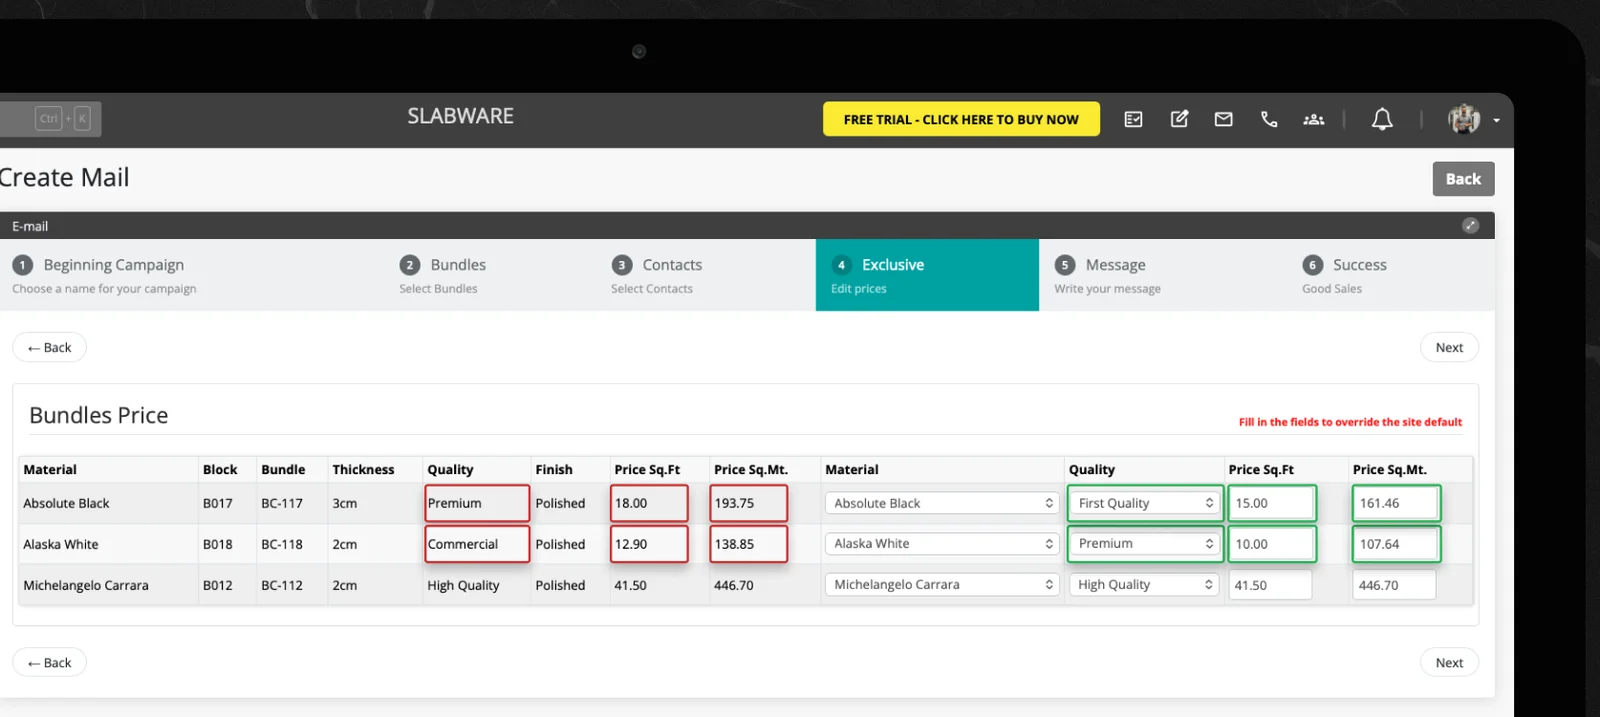
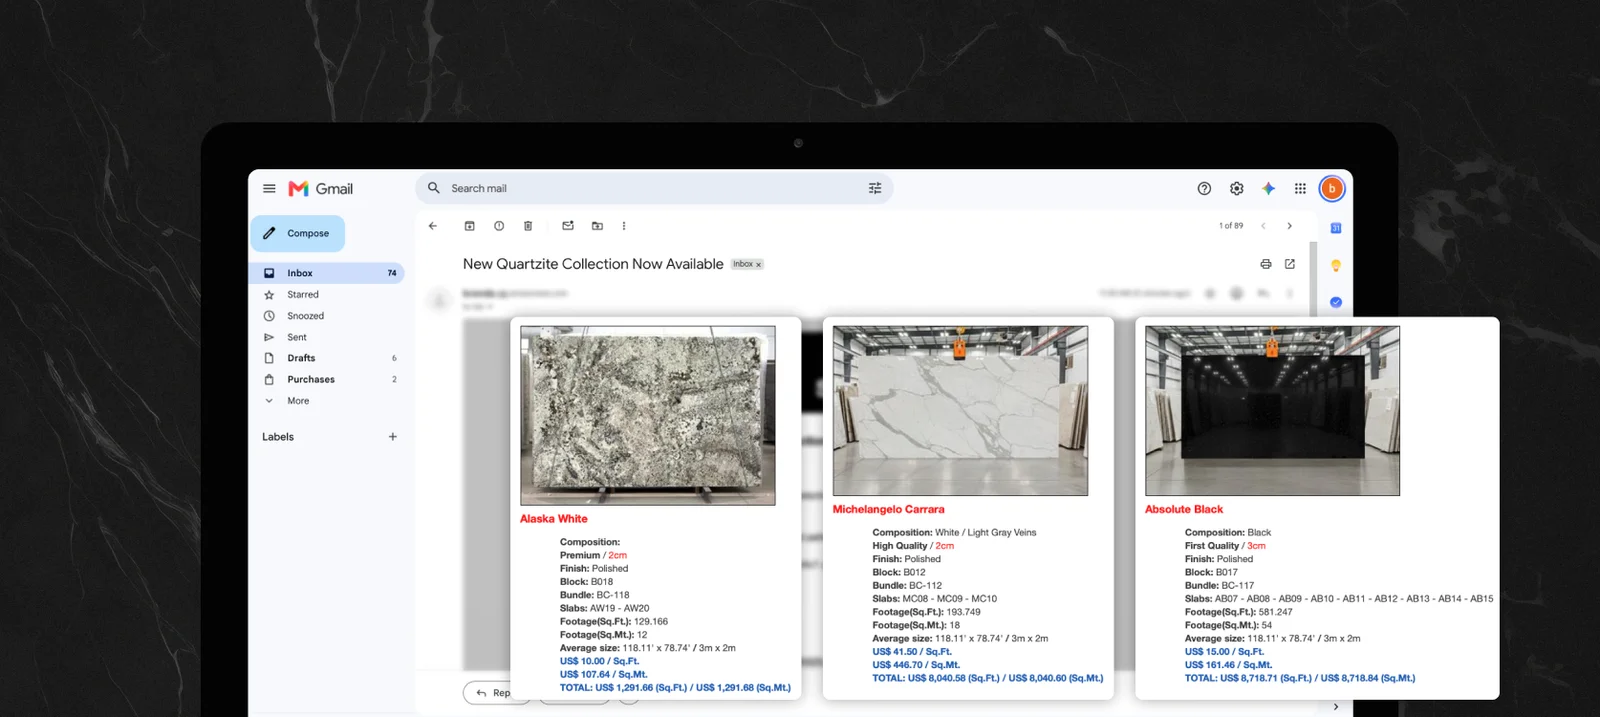
Complete the subject, body text, and send. The recipient receives a customized price sheet visible only to them!
🚀 Phase 6: Sending and Reviewing
Review your settings and click Send.
Click Go to Mailing List to view your campaign status.
Check your recipient inbox to confirm layout formatting.
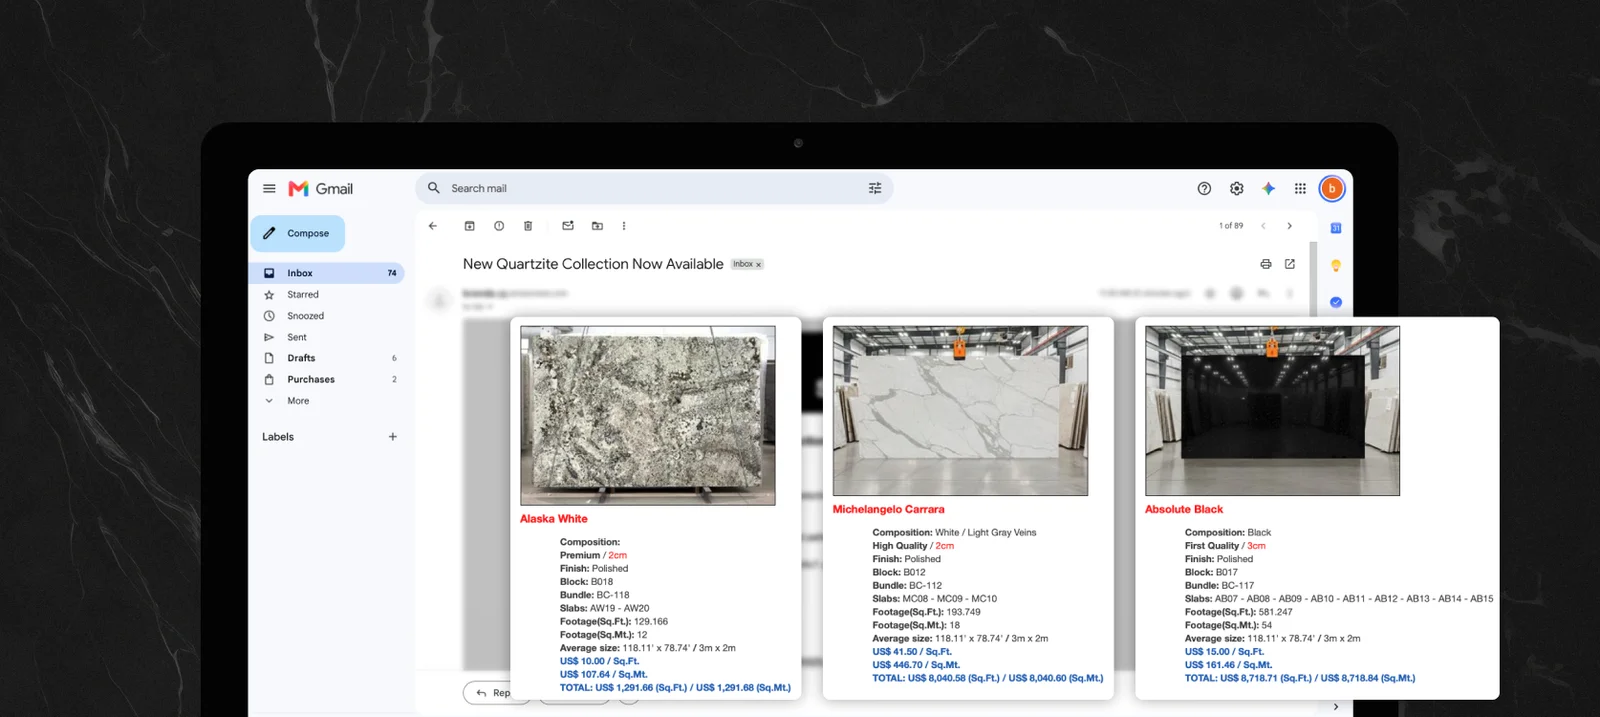
You can check the Statistics in the List of Mailing to see the status and insights of people who viewed or interacted with your message.
💡 Deliverability Tip: Commercial marketing emails may occasionally land under the recipient's Promotions tab depending on their email provider's filtering rules. Encourage your regular buyers to mark your emails as "Primary"!
📈 Scale Your Stone Distribution with SlabWare
Using SlabWare's integrated mailing system eliminates the need for third-party newsletter tools while giving your sales team full visibility over inventory views, customer interest, and direct sales leads.
👉 Visit SlabWare.com to start your free trial today!
Email marketing is one of the most effective ways for stone distributors to promote new arrivals, announce inventory sales, and showcase high-value bundles directly to fabricators and commercial clients.
With SlabWare Distributor, the built-in Mailing feature works like a targeted newsletter system—allowing you to pick specific inventory bundles, select target contacts, customize layouts, and track open and click rates in real time.
In this tutorial, we will walk you through setting up, sending, and tracking email mailings in SlabWare Distributor.
📋 Prerequisites Before You Begin
To ensure your mailing campaign runs smoothly:
Customer Contacts: Ensure your customers are registered in SlabWare with valid email addresses.
Updated Inventory: Confirm that your stone bundles have updated photos, specifications, and dimensions in the system.
Mailing Permissions: Make sure your user profile has mailing permissions enabled. (If access is blocked, follow the prompt links to complete your Email and User Settings setup).
📊 Phase 1: Navigating the Mailing Directory & Analytics Dashboard
To view past campaigns or access analytics:
Go to Mailing ➔ List of Mailing from the main menu.
Here, you will see a comprehensive log of all sent and scheduled campaigns, including creation date, creator, scheduled delivery time, and mailing type.
Available Directory Actions:
🔗 Copy Link: Share a web URL of the selected bundle catalog directly with anyone.
📋 Clone: Duplicate an existing campaign layout to save time on future mailings.
📦 View Bundles: Re-examine the specific bundles included in a past campaign.
📥 Export Excel Report: Download a detailed spreadsheet containing recipient activity and contact lists.
✏️ Edit/Delete: Modify pending mailings or remove old campaigns from your dashboard.
📈 Performance Tracking (Chart Icon): Click the chart icon to track campaign metrics:
Total Emails Sent
Email Open Rate (Views)
Click-Through Rate (Clicks)
🛠️ Phase 2: Creating a New Mailing Campaign
From the main menu, click Mailing or click the + New button at the top of the List of Mailing page.
Select your delivery channel and campaign style:
Mailing Type Options
Via Mailing --> For broadcasting to large customer lists (50+ contacts)
Direct Mail --> Recommended for small groups (Up to 50 contacts) │ *Optional: Check "Generate Opportunity" to create a CRM task
Exclusive Email --> Allows override of standard price/sq.ft or sq.m per bundle (Sent via Mailing or Direct Mail)
Type a clear internal Description (e.g., "June Taj Mahal Promotion") and click Next.
Make sure your user profile has mailing permissions enabled. If that is not the case, some functions will be disabled in this screen.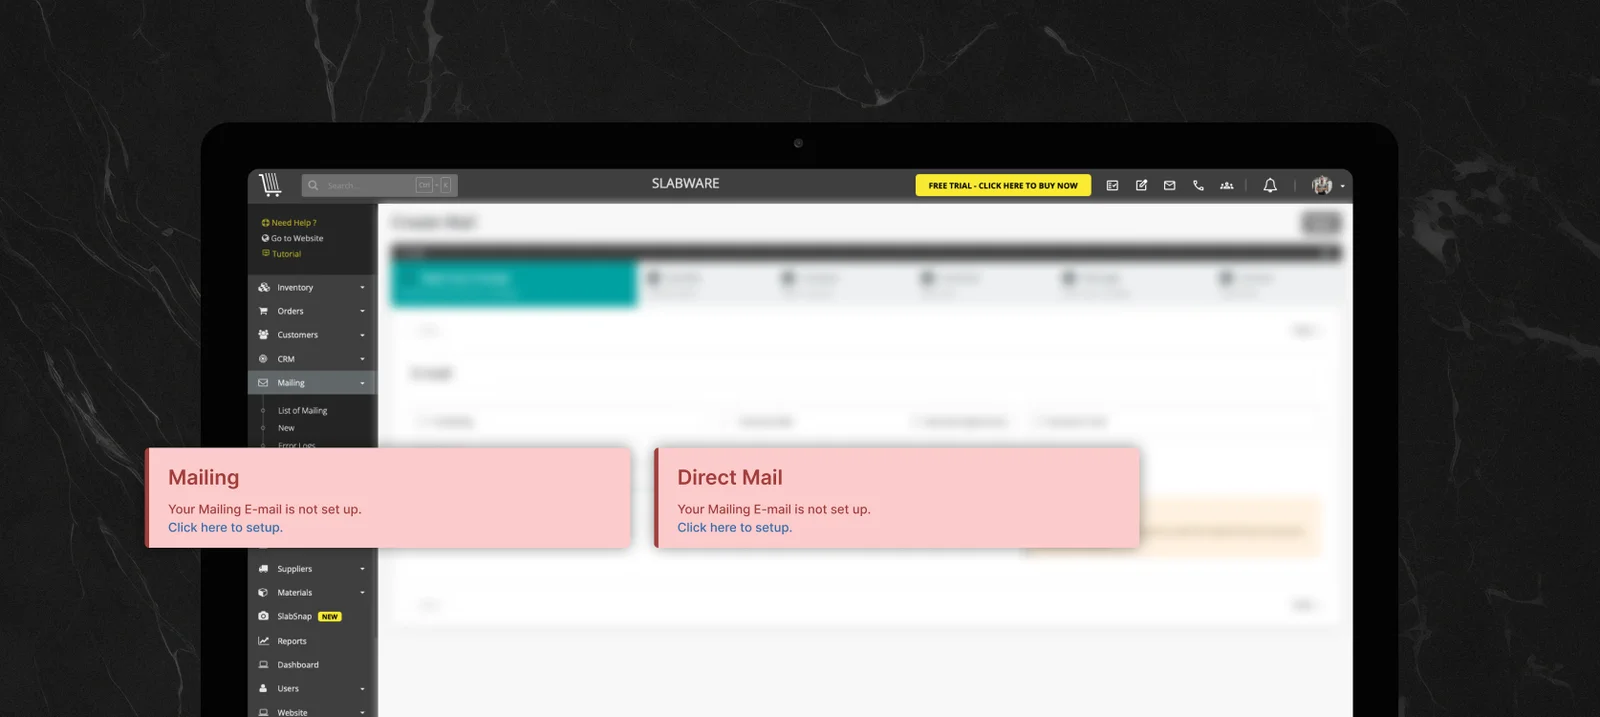
If that happens, check out this YouTube video to learn how to configure your permissions.
📦 Phase 3: Selecting Inventory Bundles
On the Select Bundles page, sort your available inventory under Order By:
Material: Alphabetical order by stone type.
Created On: Recently added stock.
Sales Price: Highest to lowest pricing.
Use the search bar or filters to locate specific materials or lot numbers.
Check the boxes next to the bundles you want to feature, then click Next.
👥 Phase 4: Choosing Target Recipients
Search and select the customer contacts who should receive the campaign.
Check individual boxes or choose Select All.
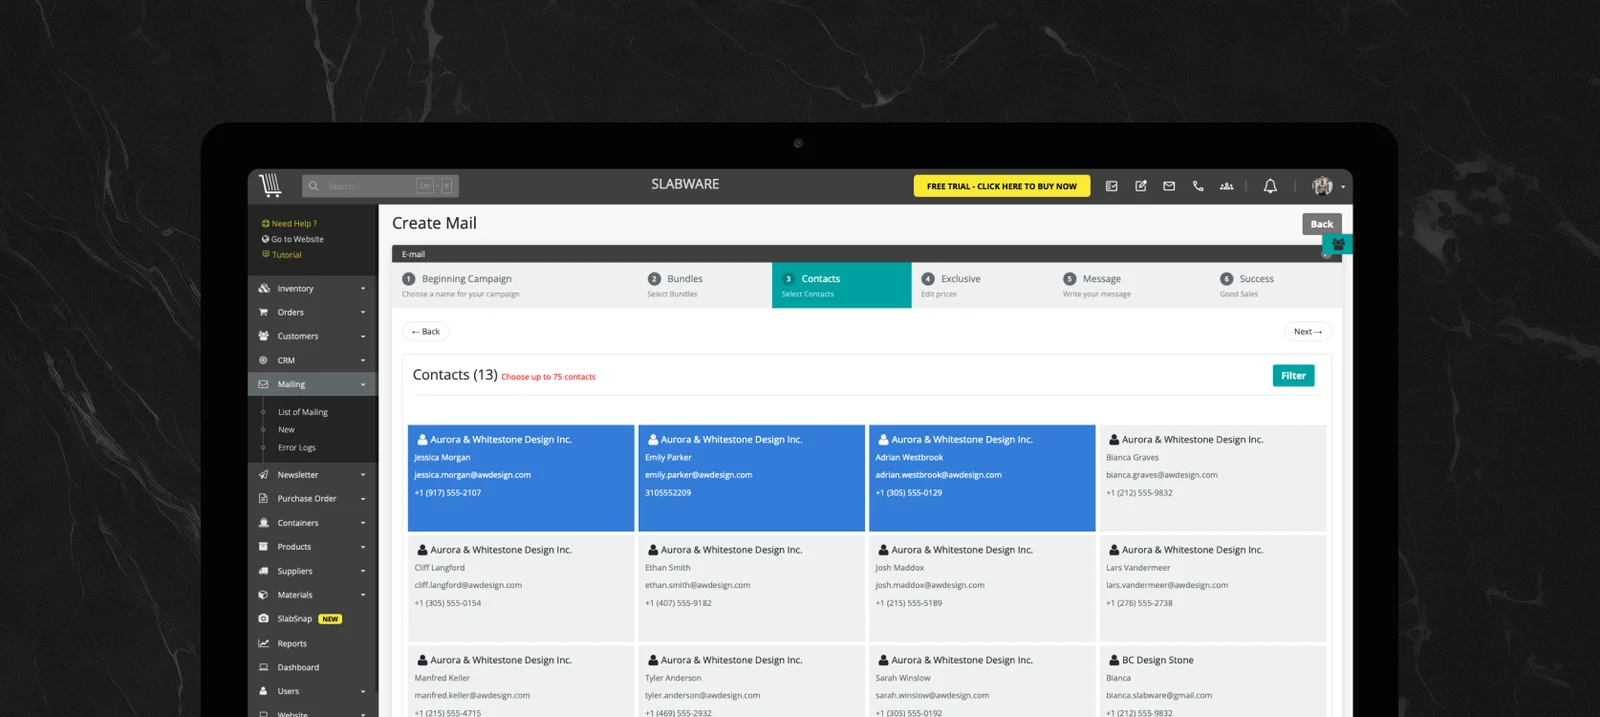
Click Next to proceed to email configuration.
✉️ Phase 5: Configuring the Email Layout & Settings
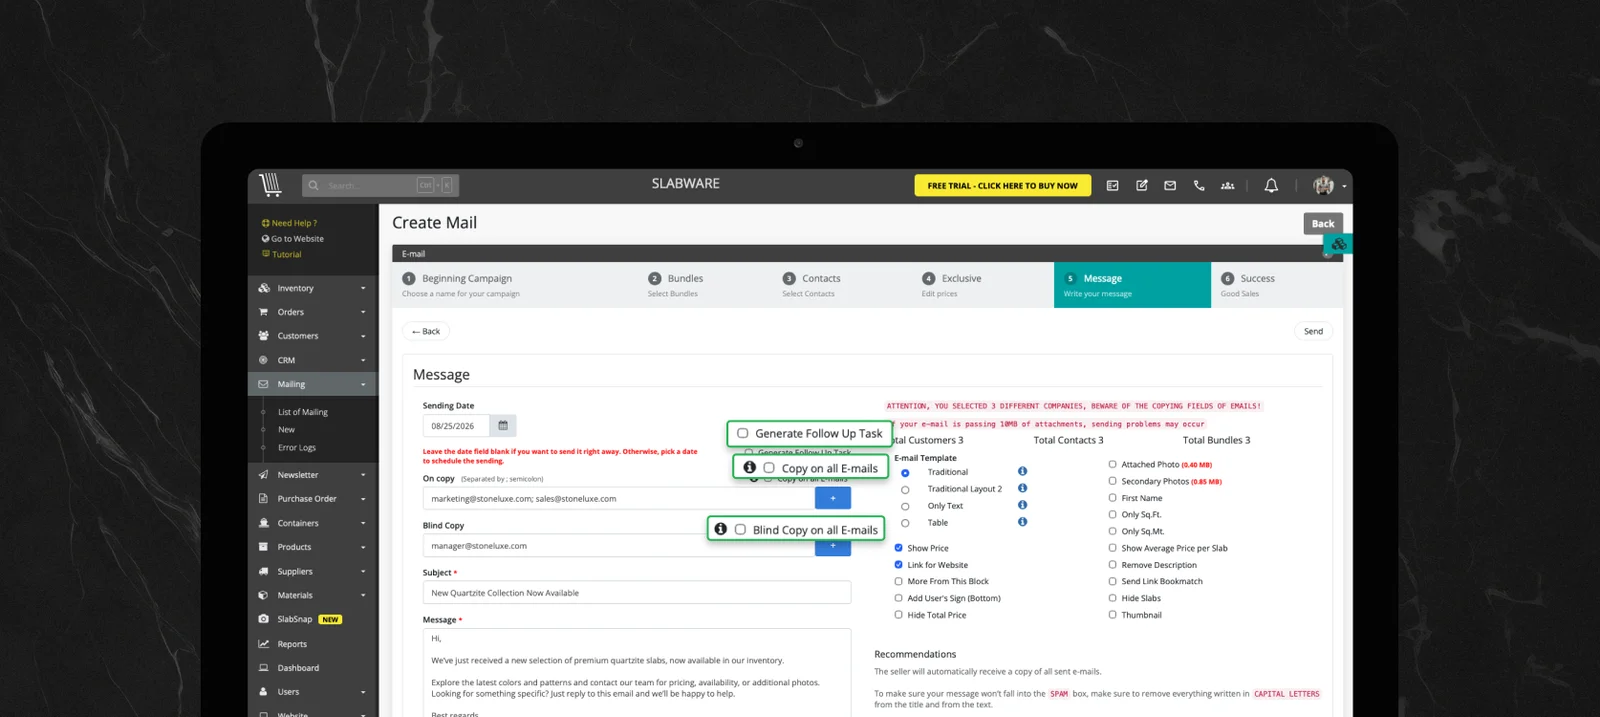
On the email configuration screen, customize your delivery schedules, tracking rules, and visuals:
1. Delivery & CRM Settings
Scheduled Date: Choose a future date/time to send the email. Leave blank to send immediately.
Generate Follow-upTask: Check this box to automatically assign a follow-up task in your CRM pipeline.
Copy / Blind Copy (CC / BCC): Add team members or external emails who need to monitor the mailing.
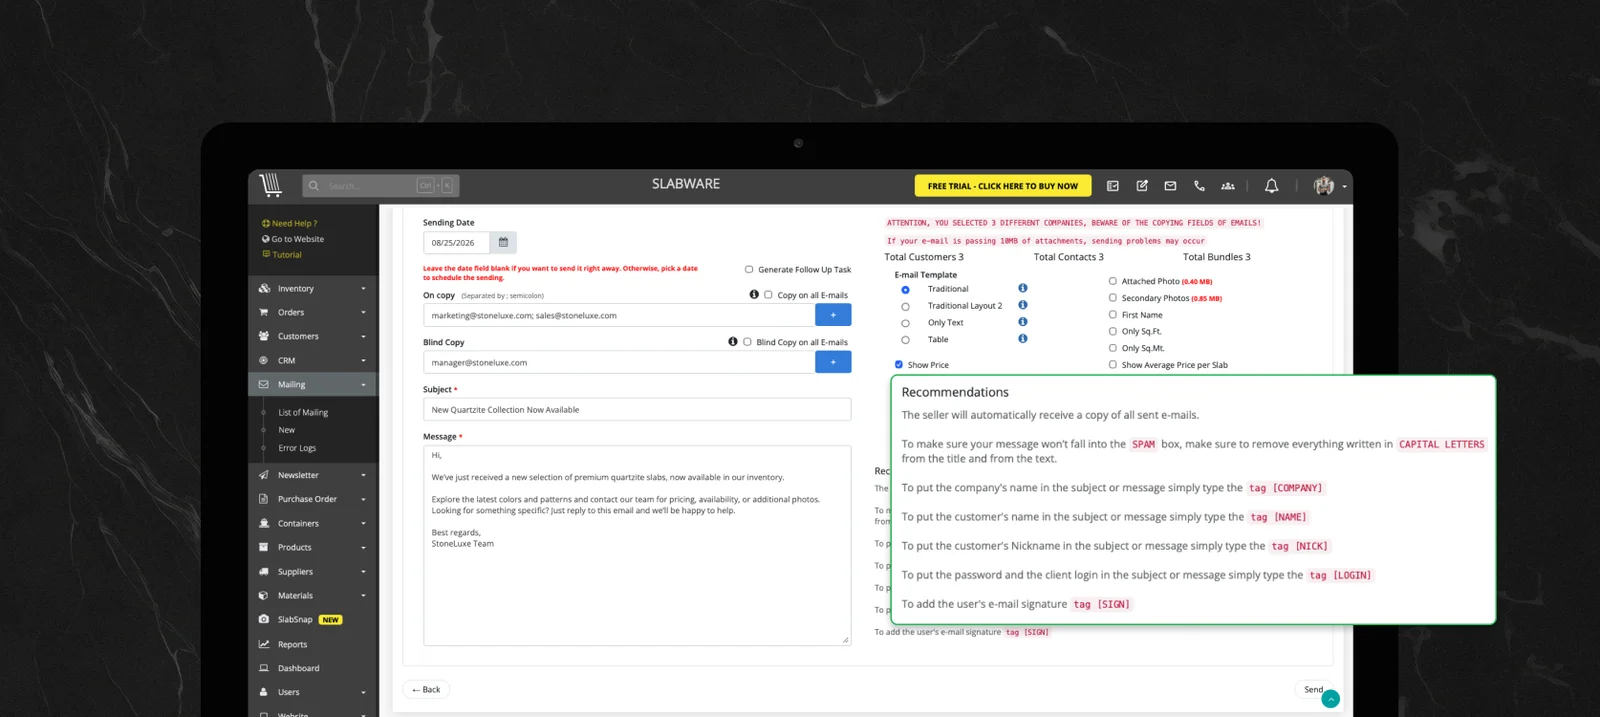
2. Subject & Message Body
Type an engaging Subject Line (e.g., "Exclusive New Arrival: Premium Calacatta Bundles In Stock").
Write your message in the body editor. You can insert dynamic tags recommended at the bottom of the page to personalize the message.
3. Choose Your Email Template
Click the blue info icon to preview the available template formats:
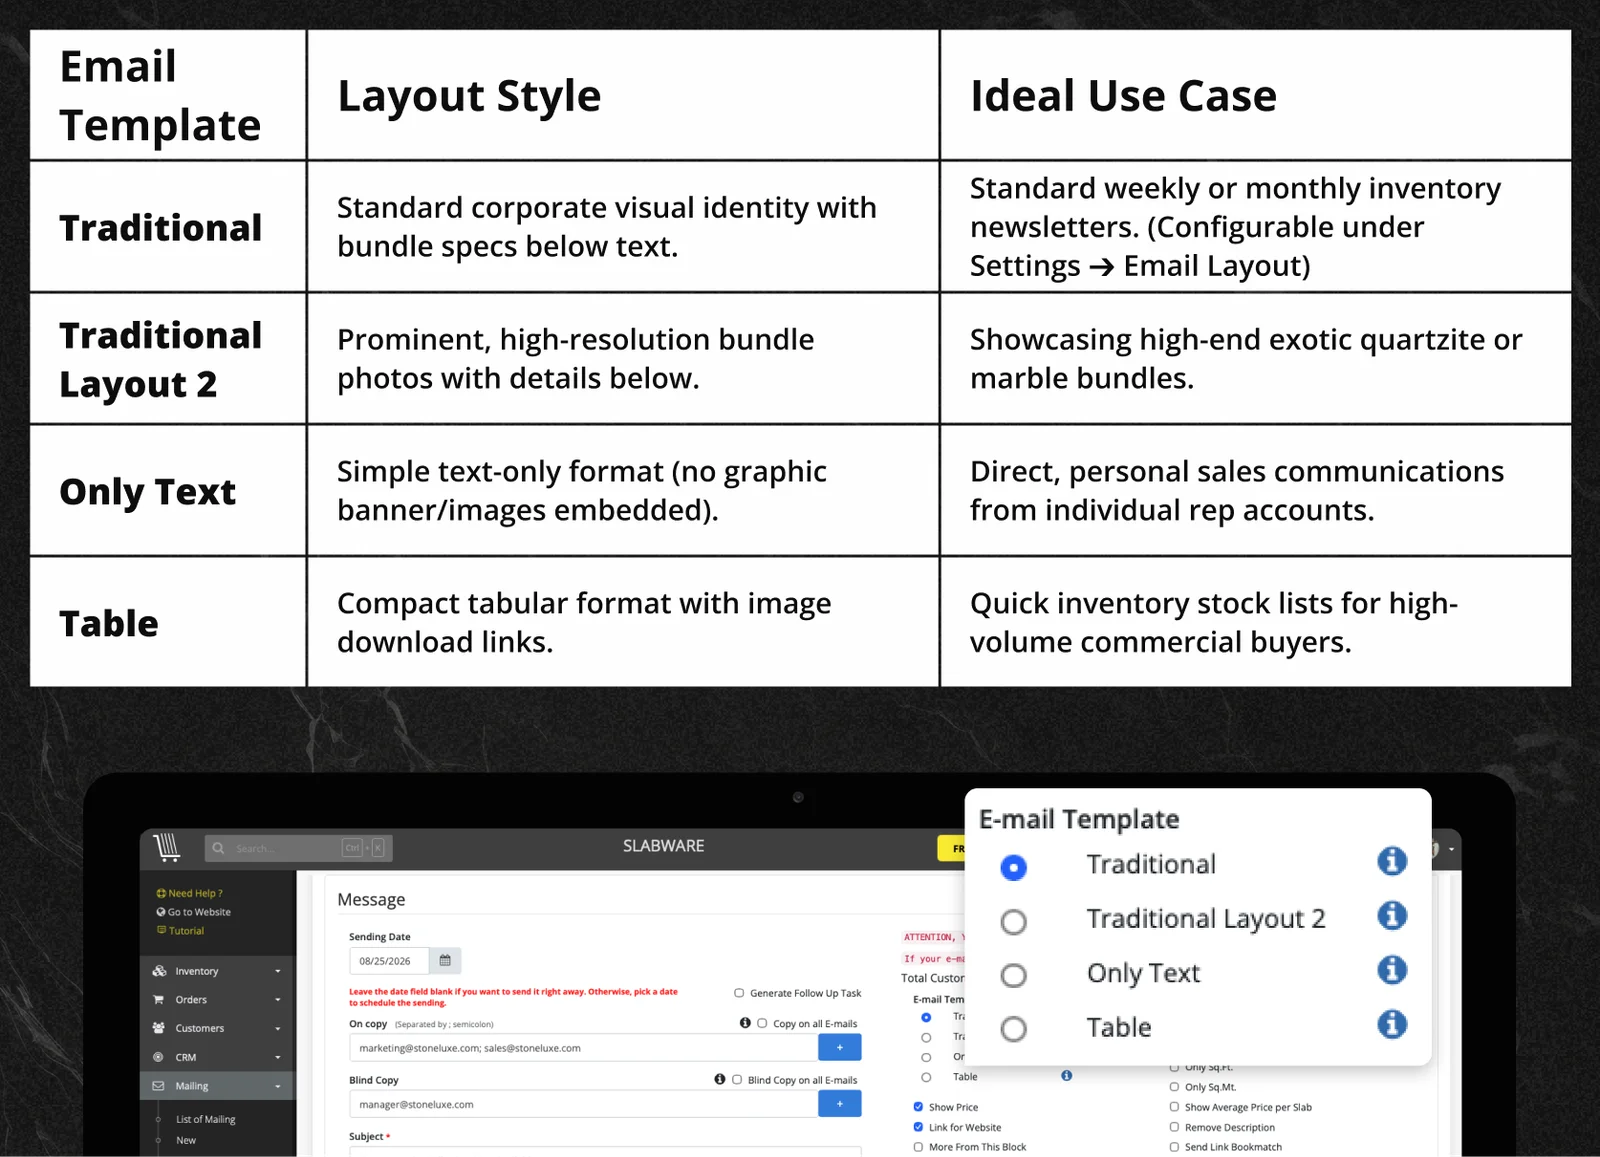
⚠️ Important Note on Text-Only Templates: The link displayed at the bottom of the Only Text format is an Unsubscribe Link, not a bundle catalog link. If using this format, ensure you paste the catalog link directly into the email text!
💲 Special Feature: Using "Exclusive Email" Pricing
If you choose Exclusive Email during Phase 2, you can adjust price quotes for specific recipients without altering your baseline inventory settings:
Proceed through bundle and contact selection.
On the configuration screen, override specific fields per bundle:
Material Type & Quality Grade
Exclusive Price per Square Foot / Square Meter
Complete the subject, body text, and send. The recipient receives a customized price sheet visible only to them!
🚀 Phase 6: Sending and Reviewing
Review your settings and click Send.
Click Go to Mailing List to view your campaign status.
Check your recipient inbox to confirm layout formatting.
You can check the Statistics in the List of Mailing to see the status and insights of people who viewed or interacted with your message.
💡 Deliverability Tip: Commercial marketing emails may occasionally land under the recipient's Promotions tab depending on their email provider's filtering rules. Encourage your regular buyers to mark your emails as "Primary"!
📈 Scale Your Stone Distribution with SlabWare
Using SlabWare's integrated mailing system eliminates the need for third-party newsletter tools while giving your sales team full visibility over inventory views, customer interest, and direct sales leads.
👉 Visit SlabWare.com to start your free trial today!
Or check out the other posts in our blog by clicking here.
Keep reading